Backup Manager
The Backup Manager provides automated and on-demand backups for virtual servers. It supports incremental, differential, and full backups with multiple storage backends, retention policies, and end-user self-service.
Overview
Backups are taken at the block level while the virtual server continues running, with minimal performance impact. Intelligent consistency detection ensures backups are application-safe without requiring downtime.
The system is designed to be reliable and gentle on busy hypervisors. Backup concurrency, I/O priority, CPU priority, bandwidth limits, and disk read limits are all configurable per storage or per schedule. Resource controls ensure backups run in the background without impacting VM performance, even on heavily loaded hypervisors.
Backups can be stored on SSH/SFTP servers, S3-compatible object storage (AWS, MinIO, Wasabi, R2, B2), FTP/FTPS servers, or any suitable provider supported by rclone. There is also a tight native integration with Proxmox Backup Server, providing chunk-level deduplication and efficient storage without requiring any additional software on your hypervisors.
Supported Storage Backends
| Backend | Incremental | Encryption | Deduplication |
|---|---|---|---|
| SSH/SFTP | |||
| S3-compatible (AWS, MinIO, Wasabi, R2, B2) | |||
| Proxmox Backup Server (PBS) | |||
| FTP/FTPS | |||
| Rclone |
Local filesystem storage is supported by the backup engine but is not currently available in VirtFusion. Backups stored locally on the hypervisor do not provide protection against hardware failure and cannot be accessed from other hypervisors, limiting the ability to restore VMs after a migration or hardware loss. A remote storage backend is strongly recommended.
Backup Types
| Type | Description |
|---|---|
| Full | Complete disk image. Forms the baseline for an incremental chain. |
| Incremental | Only blocks changed since the last backup. Smallest and fastest. |
| Differential | All blocks changed since the last full backup. |
| Copy | Standalone full backup without affecting the incremental chain. |
The system automatically manages backup chains. After a configurable interval (default: 7 days), a new full backup is taken to start a fresh chain.
Supported Disk Types
| Disk Format | Incremental | Notes |
|---|---|---|
| qcow2 | Recommended. Persistent dirty bitmaps survive VM reboots and live migrations. | |
| Raw (file-backed) | Dirty bitmaps are non-persistent. A VM reboot or crash will reset the bitmap, causing the next backup to fall back to a full backup. Incremental chains work correctly as long as the VM remains running between backups. | |
| Ceph RBD | Persistent change tracking. Survives reboots and migrations. |
Raw disk limitation: If a VM using raw disk images is rebooted between backups, the incremental tracking bitmap is lost. The next scheduled backup will automatically detect this and perform a full backup to start a fresh chain. This is a QEMU limitation with raw format disks. If your VMs reboot frequently, consider using qcow2 format for more efficient incremental backups.
StorPool: StorPool block storage is not currently supported. We are actively working with StorPool to find a resolution.
Access Levels
Each virtual server has a backup access level that controls what operations are permitted:
| Level | Included in Scheduled Backups | End User Can View | End User Can Restore | End User Can Backup |
|---|---|---|---|---|
| Disabled | ||||
| Scheduled Only | ||||
| View & Restore | ||||
| Full Access | ||||
| Manual Only |
Access levels are resolved in order: per-server override, then schedule default. If no override is set, the schedule's default applies.
Getting Started
Setting up backups requires three steps:
- Add a storage backend
- Create a schedule linking a hypervisor to that storage
- Backups run automatically on the configured interval
Step 1: Add Storage
Navigate to Backup Manager → Storage and click Add Storage.
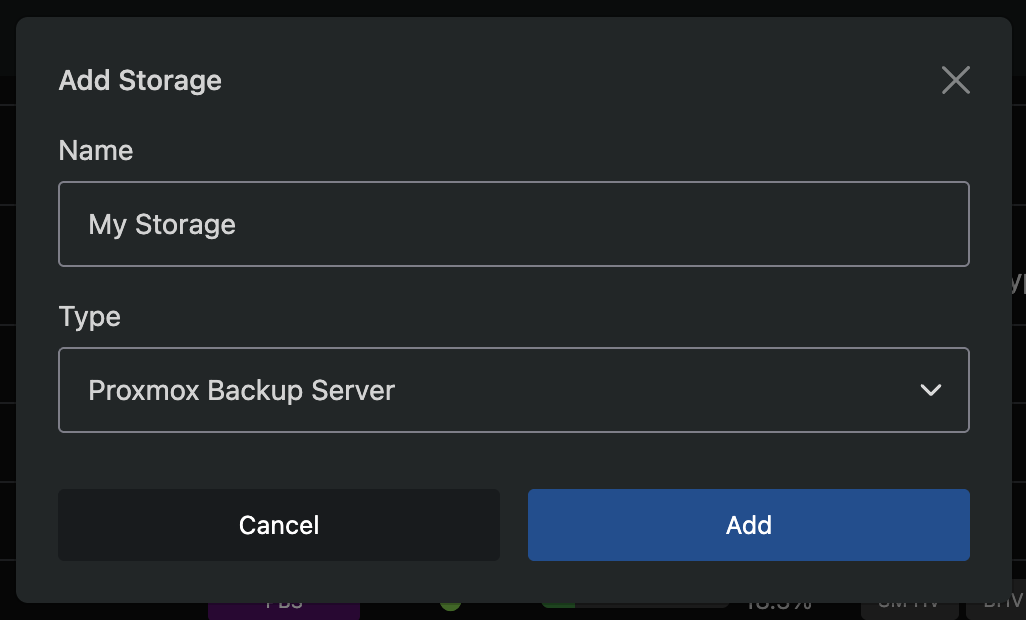
A modal will appear where you select a storage type and enter a name. After saving, you will be taken to the storage configuration page.
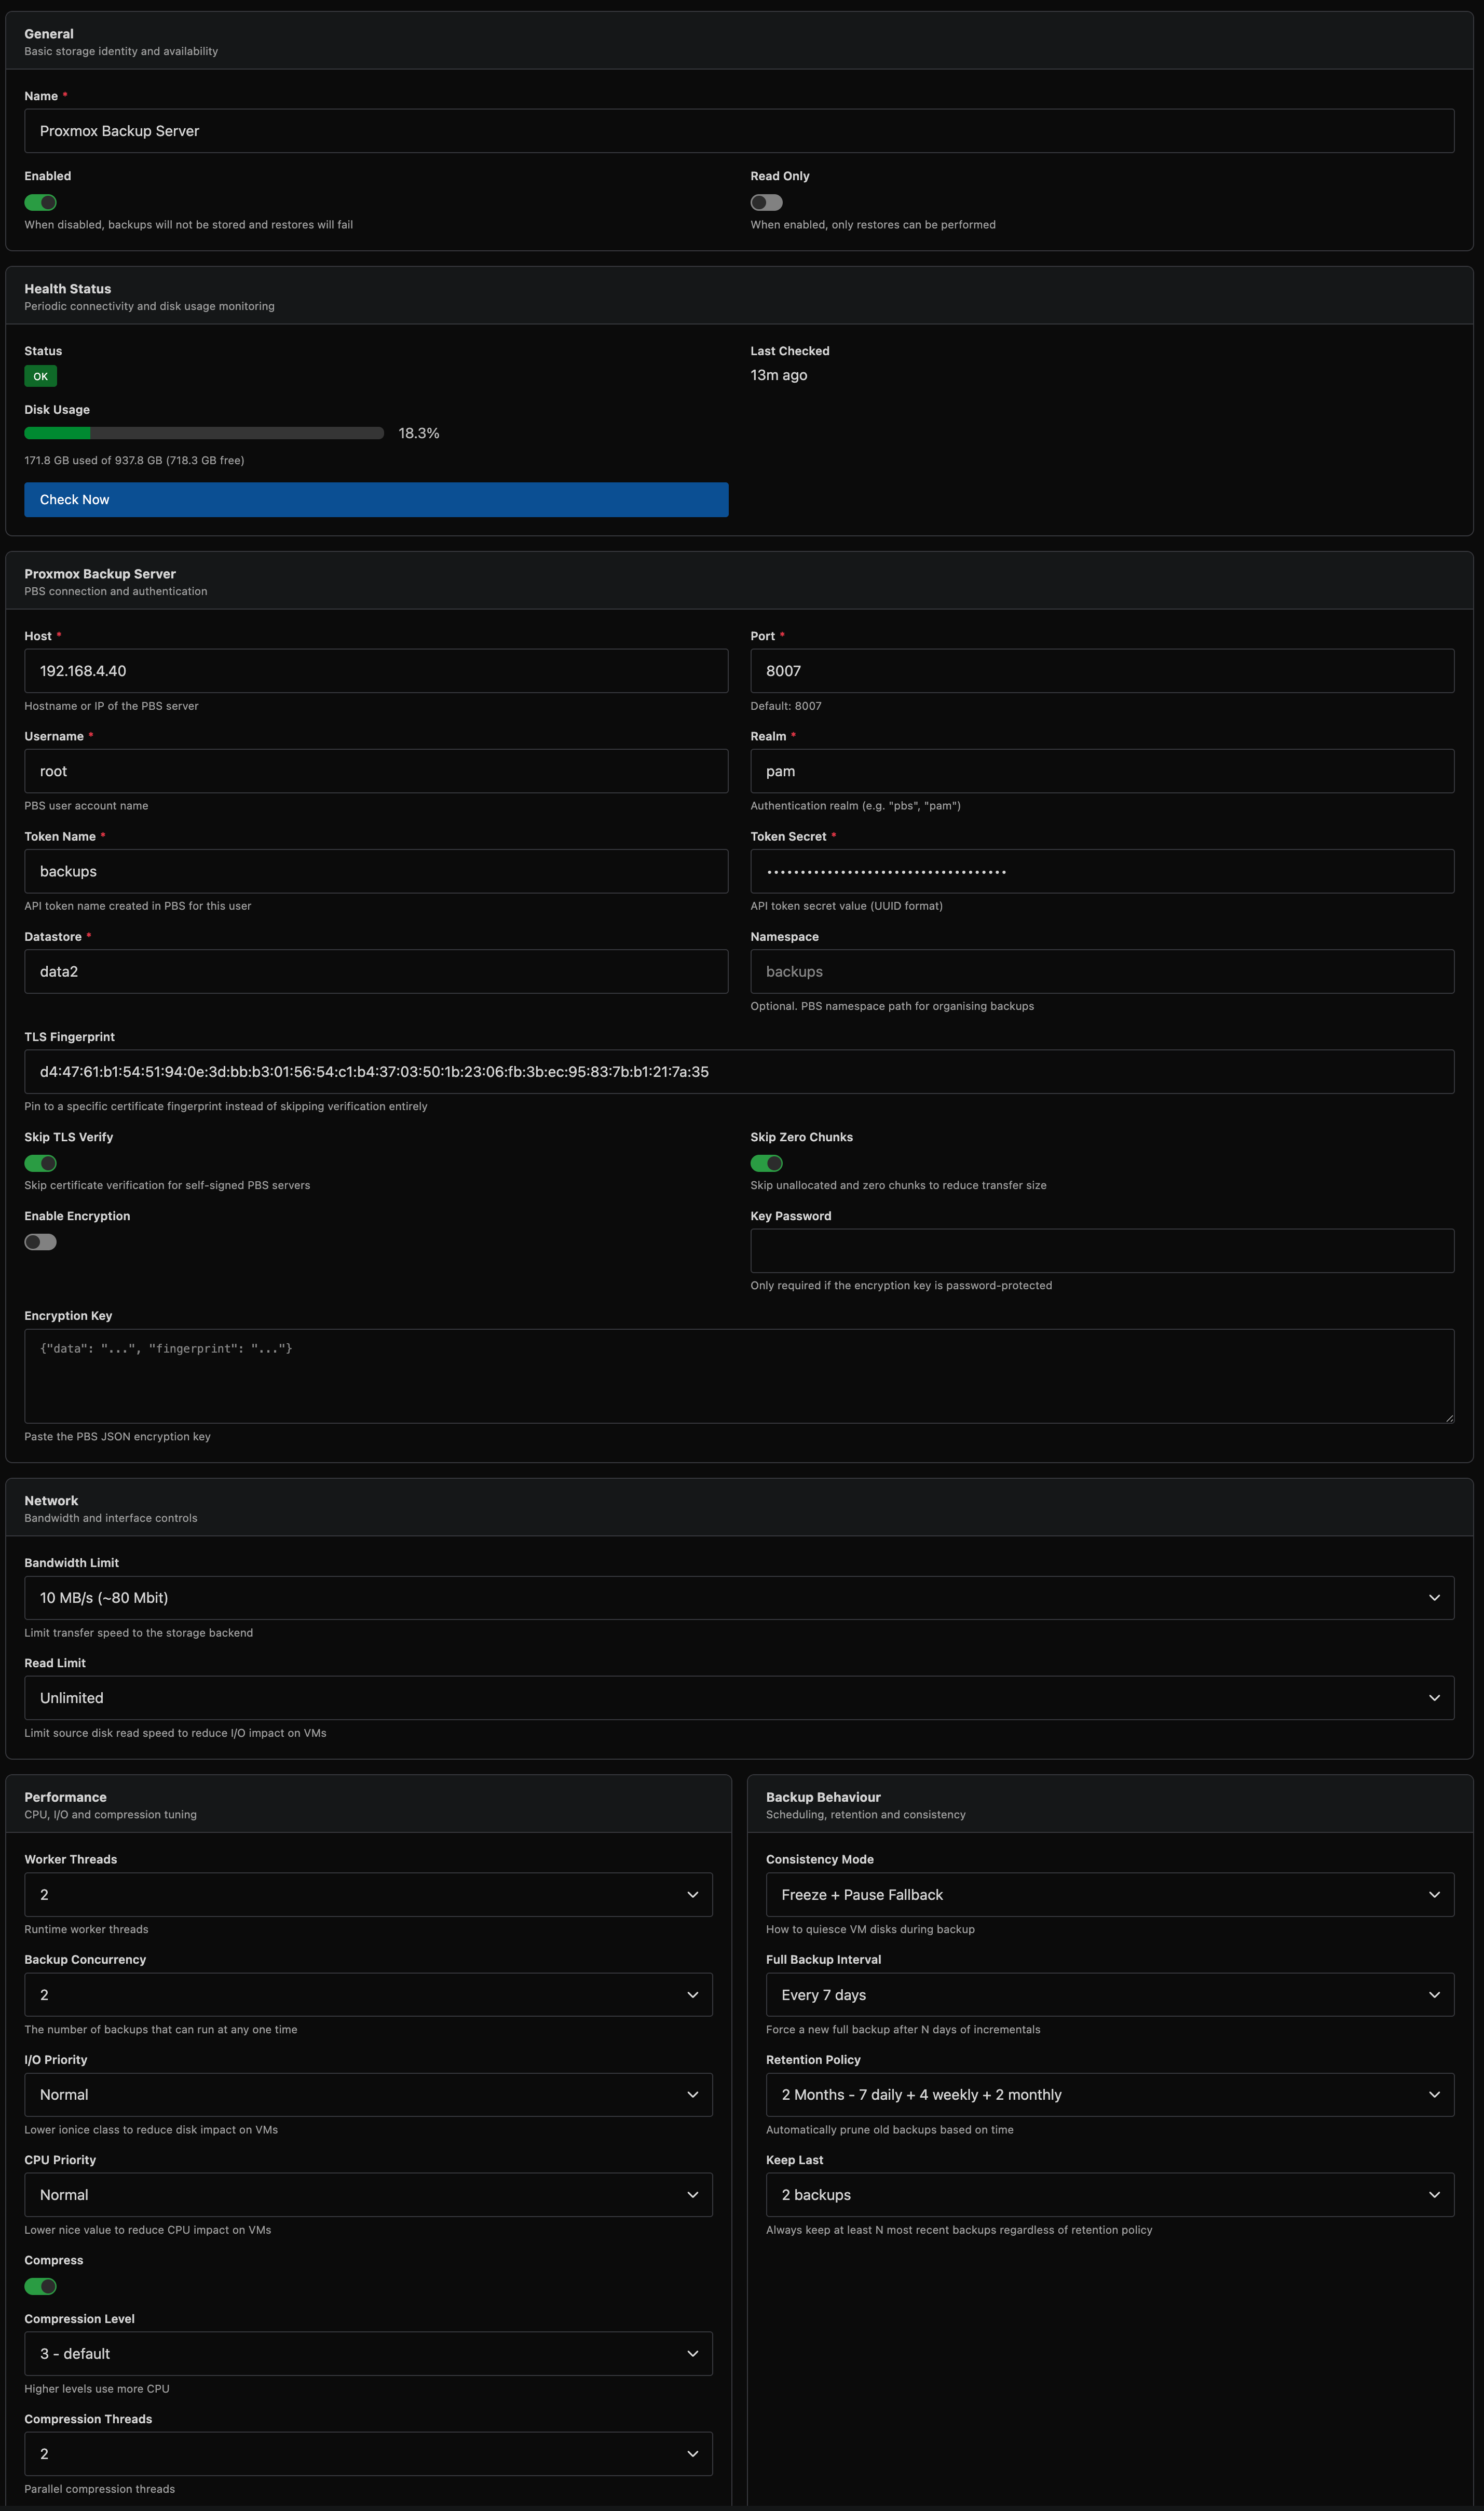
Step 2: Configure Storage
Each storage type has its own connection settings. Configure the connection details for your chosen backend.
SSH/SFTP
| Field | Description |
|---|---|
| Host | Hostname or IP address of the SSH server |
| Username | SSH username |
| Port | SSH port (default: 22) |
| Path | Absolute path on the remote server for backup storage |
| Private Key | PEM-formatted private key for authentication |
SSH Server Configuration
For reliable backups and restores, especially for large disks that transfer for several hours, the remote SSH server should be configured to maintain long-lived connections. Add or verify the following settings in /etc/ssh/sshd_config on the storage server:
# Send keepalive probes every 60 seconds to detect dead clients
ClientAliveInterval 60

# Allow 3 missed keepalives before disconnecting (3 minutes tolerance)
ClientAliveCountMax 3

# Allow enough sessions for concurrent backup operations
MaxSessions 20
After editing, restart sshd: systemctl restart sshd
If you are using a cloud firewall (e.g. Hetzner Cloud Firewall, AWS Security Groups with connection tracking), be aware that stateful firewalls have connection tracking timeouts that can silently drop long-lived TCP connections. If backups or restores fail consistently after several hours, try disabling the cloud firewall as a test, or ensure the connection tracking timeout exceeds your longest expected transfer time.
You should also verify that no system-level TCP timeouts are too aggressive:
# Check connection tracking timeout (if conntrack is active)
sysctl net.netfilter.nf_conntrack_tcp_timeout_established
# Should be at least 14400 (4 hours), default is 432000 (5 days)
S3-Compatible Object Storage
| Field | Description |
|---|---|
| Bucket | S3 bucket name |
| Region | AWS region (e.g. us-east-1) |
| Endpoint | Custom endpoint URL for non-AWS providers (MinIO, Wasabi, R2, B2) |
| Access Key | S3 access key ID |
| Secret Key | S3 secret access key |
| Key Prefix | Optional path prefix within the bucket |
| Concurrency | Number of parallel upload threads (default: 8) |
| Part Size (MB) | Minimum S3 multipart upload part size (default: auto, 10 MB) |
Backups are uploaded to S3 using multipart uploads. The part size is automatically calculated based on disk size, targeting approximately 2,000 parts per upload. For most deployments the default is fine. If your S3 provider drops connections or times out during large uploads, increase the part size to reduce the number of parts and total upload time. This is most commonly needed with smaller or less mature S3-compatible providers.
Proxmox Backup Server
VirtFusion integrates natively with Proxmox Backup Server using the PBS protocol directly. No proxmox-backup-client installation is required on your hypervisors.
| Field | Description |
|---|---|
| Host | PBS server hostname or IP |
| Port | API port (default: 8007) |
| Username | PBS username |
| Realm | Authentication realm (e.g. pbs, pam) |
| Token Name | API token name |
| Token Secret | API token secret (UUID format) |
| Datastore | PBS datastore name |
| Namespace | Optional PBS namespace |
| TLS Fingerprint | SHA-256 fingerprint for certificate pinning (optional) |
| Skip TLS Verify | Bypass TLS certificate validation |
| Skip Zero Chunks | Skip unallocated regions in full backups (reduces storage usage) |
Setting up PBS access:
-
Create an API token: In the PBS web UI, go to Configuration → Access Control → API Token. Click Add and create a token for your backup user. Note the Token Name and Token Secret (the secret is only shown once).
-
Datastore: Go to Administration → Storage / Disks to see your available datastores. Enter the datastore name exactly as shown.
-
Namespace (optional): If you use PBS namespaces to organise backups, enter the namespace path (e.g.
virtfusionordc1/virtfusion). Leave blank to use the datastore root. -
TLS Fingerprint: In the PBS web UI, the SHA-256 fingerprint is shown on the Dashboard in the top-right corner. Copy the full fingerprint string. This is recommended when the PBS server uses a self-signed certificate.
-
Permissions: The API token needs at minimum DatastoreBackup and DatastoreReader privileges on the target datastore/namespace.
For full details, see the Proxmox Backup Server documentation.
PBS Encryption
PBS supports client-side encryption where backup data is encrypted before being sent to the server. The PBS server never sees unencrypted data.
To set up encryption:
-
Generate an encryption key by running the following on any Linux machine:
echo '{"kdf":"none","data":"'$(openssl rand -base64 32)'"}'This produces a JSON key like:
{"kdf":"none","data":"xY7f3kLm9QzB1vN4hR8wJ2pA5sT0uE6gC3iO7dF9aXk="}Alternatively, if you have
proxmox-backup-clientinstalled, you can use:proxmox-backup-client key create --kdf none /tmp/backup-key.jsoncat /tmp/backup-key.json -
Paste the JSON key into the Encryption Key field in the PBS section of the storage configuration.
-
Enable encryption - toggle Enable Encryption on.
-
Key Password - leave blank when using a key generated with the commands above. This field is only needed if the key was created with password protection (e.g.
proxmox-backup-client key createwithout--kdf none).
Store your encryption key and password securely. If the key is lost, encrypted backups cannot be restored. Encryption settings cannot be changed after backups have been created - changing the key will make existing backups unrestorable.
Enabling encryption disables PBS server-side deduplication. Each backup will consume its full size on the PBS server rather than only storing changed chunks. Consider whether encryption or deduplication is more important for your use case.
FTP/FTPS
| Field | Description |
|---|---|
| Host | FTP server hostname or IP |
| Port | FTP port (default: 21) |
| Username | FTP username |
| Password | FTP password |
| Remote Path | Directory path on the FTP server |
| TLS Max Version | TLS 1.2 (for vsFTPd compatibility) or TLS 1.3 |
| Disable TLS | Use plain FTP (not recommended) |
| Skip TLS Verify | Bypass TLS certificate validation |
Rclone
| Field | Description |
|---|---|
| Remote Name | Name of the configured rclone remote |
| Remote Path | Path on the remote |
| S3 Concurrency | Parallel upload threads for S3-compatible remotes |
The rclone configuration file must be placed at /opt/virtfusion/rclone/rclone.conf on each hypervisor. Configure your rclone remote on the hypervisor first using rclone config, then copy the resulting config to this path:
mkdir -p /opt/virtfusion/rclone
cp ~/.config/rclone/rclone.conf /opt/virtfusion/rclone/rclone.conf
chown -R virtfusion:virtfusion /opt/virtfusion/rclone
The Backup Manager will use this file automatically.
Rclone supports a wide range of providers. The following are recommended for backup storage:
| Provider | Rclone Type | Notes |
|---|---|---|
| Any SFTP server | sftp | Excellent performance. The simplest and most reliable option. |
| Backblaze B2 | b2 | Cost-effective cloud storage with free egress to Cloudflare. |
| Google Cloud Storage | gcs | Nearline/Coldline tiers suit backup workloads. |
| Azure Blob Storage | azureblob | Cool/Archive tiers available for long-term retention. |
| Hetzner Storage Box | sftp | Affordable European storage. Use SFTP (port 23), not WebDAV. |
| OpenStack Swift | swift | Common in hosting environments (OVH, IONOS, etc). Files over 5 GiB use automatic chunking. |
| Storj | storj or s3 | Decentralised storage with erasure coding. |
MEGA and Dropbox are not suitable for backup storage. MEGA does not support streaming uploads (the entire backup file is spooled to local disk before uploading). Dropbox is unreliable for large file uploads due to rate limiting and transfer stalls.
For S3-compatible providers (AWS, MinIO, Wasabi, Cloudflare R2, Backblaze B2), the native S3 storage backend is recommended over rclone as it provides better performance with direct streaming uploads.
Storage Status
Each storage backend has two independent toggles: Enabled and Read Only.
| State | Backups | Restores | Scheduled Batches |
|---|---|---|---|
| Enabled | |||
| Enabled + Read Only | |||
| Disabled |
- Enabled: normal operation. All backup and restore operations work.
- Enabled + Read Only: no new backups are written, but restores from existing backups continue to work. Useful when decommissioning a storage backend or during maintenance.
- Disabled: all operations are blocked. Neither backups nor restores can be performed.
Common Storage Settings
These settings apply to all storage types.
Network
| Setting | Description |
|---|---|
| Bandwidth Limit | Maximum upload speed (unlimited by default) |
| Read Limit | Maximum disk read speed (unlimited by default) |
Encryption
Encryption settings cannot be changed after backups have been created. Changing the passphrase will make existing backups unrestorable.
| Setting | Description |
|---|---|
| Enable Encryption | Encrypt backup data with authenticated encryption |
| Passphrase | Encryption passphrase. Store this securely as it cannot be recovered |
For PBS storage, encryption is configured in the PBS-specific section using PBS-native encryption.
Performance
| Setting | Description | Default |
|---|---|---|
| Worker Threads | Number of parallel processing threads | 4 |
| Backup Concurrency | Maximum concurrent VM backups per hypervisor | 1 |
| I/O Priority | Disk I/O scheduling priority (Normal, Low, Idle) | Normal |
| CPU Priority | Process CPU priority (Normal, Low, Idle) | Normal |
| Compress | Enable zstd compression | |
| Compression Level | zstd level 1 (fastest) to 19 (best ratio) | 3 |
| Compression Threads | Threads for compression | 1 |
Backup Concurrency controls how many VMs are backed up simultaneously on a single hypervisor. Higher values complete batches faster but increase disk I/O load. Start with 1 and increase based on your storage performance.
Backup Behaviour
| Setting | Description | Default |
|---|---|---|
| Consistency Mode | How the VM is quiesced during backup | Freeze + Pause Fallback |
| Full Backup Interval | Days between forced full backups (not applicable for PBS) | 7 |
| Retention Policy | Retention strategy - age-based (keep all within N days) or GFS (calendar-based thinning) | None |
| Keep Last | Always keep at least N most recent backups | 2 |
PBS storage differences:
- Full Backup Interval is ignored. PBS snapshots are independently restorable regardless of type, so forced full backups are unnecessary.
- Skip Zero Chunks (PBS-only setting) skips unallocated disk regions during full backups, significantly reducing storage usage for sparsely allocated disks.
- Keep Last protects the N most recent snapshots per disk. For other backends, it protects the N most recent backup chains per disk.
Consistency Modes:
| Mode | Description |
|---|---|
| Freeze + Pause Fallback | Try guest agent filesystem freeze first; if unavailable, briefly pause the VM |
| Freeze Only | Only use guest agent freeze (fails if agent unavailable) |
| Pause Only | Briefly pause the VM (no guest agent needed) |
| None | No quiescing (crash-consistent only) |
Freeze + Pause Fallback is recommended for most deployments. It provides the best consistency when the guest agent is installed, and falls back to a brief pause (typically under 1 second) when it is not. Loop devices and Windows Reserved partitions are automatically excluded from the freeze.
Retention Policies:
Two retention models are available: age-based and GFS (Grandfather-Father-Son). Both can be combined with the Keep Last floor.
Age-Based Retention
Simple time-window retention: all backups within the window are kept, anything older is pruned.
| Preset | Keep Within |
|---|---|
| None | No auto-prune |
| 1 Week | 7 days |
| 2 Weeks | 14 days |
| 3 Weeks | 21 days |
| 4 Weeks | 28 days |
| 2 Months | 60 days |
| 3 Months | 90 days |
| 6 Months | 180 days |
| 9 Months | 270 days |
| 1 Year | 365 days |
| 2 Years | 730 days |
| 3 Years | 1095 days |
| 5 Years | 1825 days |
| 7 Years | 2555 days |
| 10 Years | 3650 days |
For example, the "3 Months" preset keeps all backups from the last 90 days.
GFS (Grandfather-Father-Son) Retention
GFS retention uses calendar-based buckets to thin out older backups while preserving recent granularity. Instead of keeping every backup within a window, GFS keeps one backup per calendar period:
- Daily - one backup per calendar day (the newest backup taken that day)
- Weekly - one backup per calendar week (ISO week, the newest backup taken that week)
- Monthly - one backup per calendar month (the newest backup taken that month)
- Yearly - one backup per calendar year (the newest backup taken that year)
Each bucket type keeps the N most recent buckets. A backup is kept if any bucket rule selects it (rules are a union, not a chain).
Example: GFS 1 Year (7 daily, 4 weekly, 12 monthly)
With daily backups, after several months you would have:
- The last 7 days of backups (one per day) - for recent recovery
- The last 4 weeks of weekly backups - for recent rollback
- The last 12 months of monthly backups - for long-term retention
Older daily and weekly backups are pruned, but one backup per month is preserved. This gives you fine granularity for recent recovery and coarse granularity for older points, using far less storage than keeping every backup for a year.
GFS Presets:
| Preset | Daily | Weekly | Monthly | Yearly |
|---|---|---|---|---|
| GFS 1 Month | 7 | 4 | - | - |
| GFS 2 Months | 7 | 4 | 2 | - |
| GFS 3 Months | 7 | 4 | 3 | - |
| GFS 6 Months | 7 | 4 | 6 | - |
| GFS 9 Months | 7 | 4 | 9 | - |
| GFS 1 Year | 7 | 4 | 12 | - |
| GFS 2 Years | 7 | 4 | 12 | 2 |
| GFS 3 Years | 7 | 4 | 12 | 3 |
| GFS 5 Years | 7 | 4 | 12 | 5 |
| GFS 7 Years | 7 | 4 | 12 | 7 |
| GFS 10 Years | 7 | 4 | 12 | 10 |
Dense GFS Presets (more daily/weekly granularity for environments with frequent backups):
| Preset | Daily | Weekly | Monthly | Yearly |
|---|---|---|---|---|
| GFS 1 Month Dense | 14 | 4 | - | - |
| GFS 2 Months Dense | 14 | 8 | 2 | - |
| GFS 3 Months Dense | 14 | 8 | 3 | - |
| GFS 6 Months Dense | 14 | 8 | 6 | - |
| GFS 9 Months Dense | 14 | 8 | 9 | - |
| GFS 1 Year Dense | 14 | 8 | 12 | - |
| GFS 2 Years Dense | 14 | 8 | 12 | 2 |
| GFS 3 Years Dense | 30 | 12 | 12 | 3 |
| GFS 5 Years Dense | 30 | 12 | 12 | 5 |
Choosing between age-based and GFS:
- Age-based is simpler - every backup within the window is kept. Best when you want guaranteed day-level granularity for the entire window and storage space is not a concern.
- GFS is more storage-efficient for longer retention periods. A "GFS 1 Year" policy might keep ~23 backups (7 daily + 4 weekly + 12 monthly) instead of ~365 with an age-based "1 Year" policy.
- GFS works best with regular backup schedules. If you back up daily, each daily bucket has one backup. If you back up weekly, most daily buckets will be empty - in that case, age-based retention is simpler and equally effective.
Test the Connection
After saving, click Save Settings & Test. Select a hypervisor from the dropdown (one that will be assigned to this storage via a schedule) and click Test. This verifies the hypervisor can connect to the storage backend and write data.
Always test the connection from at least one hypervisor before creating a schedule. A misconfigured storage will cause all backups to fail.
Step 3: Create a Schedule
Navigate to Backup Manager → Schedules and click Add Schedule.
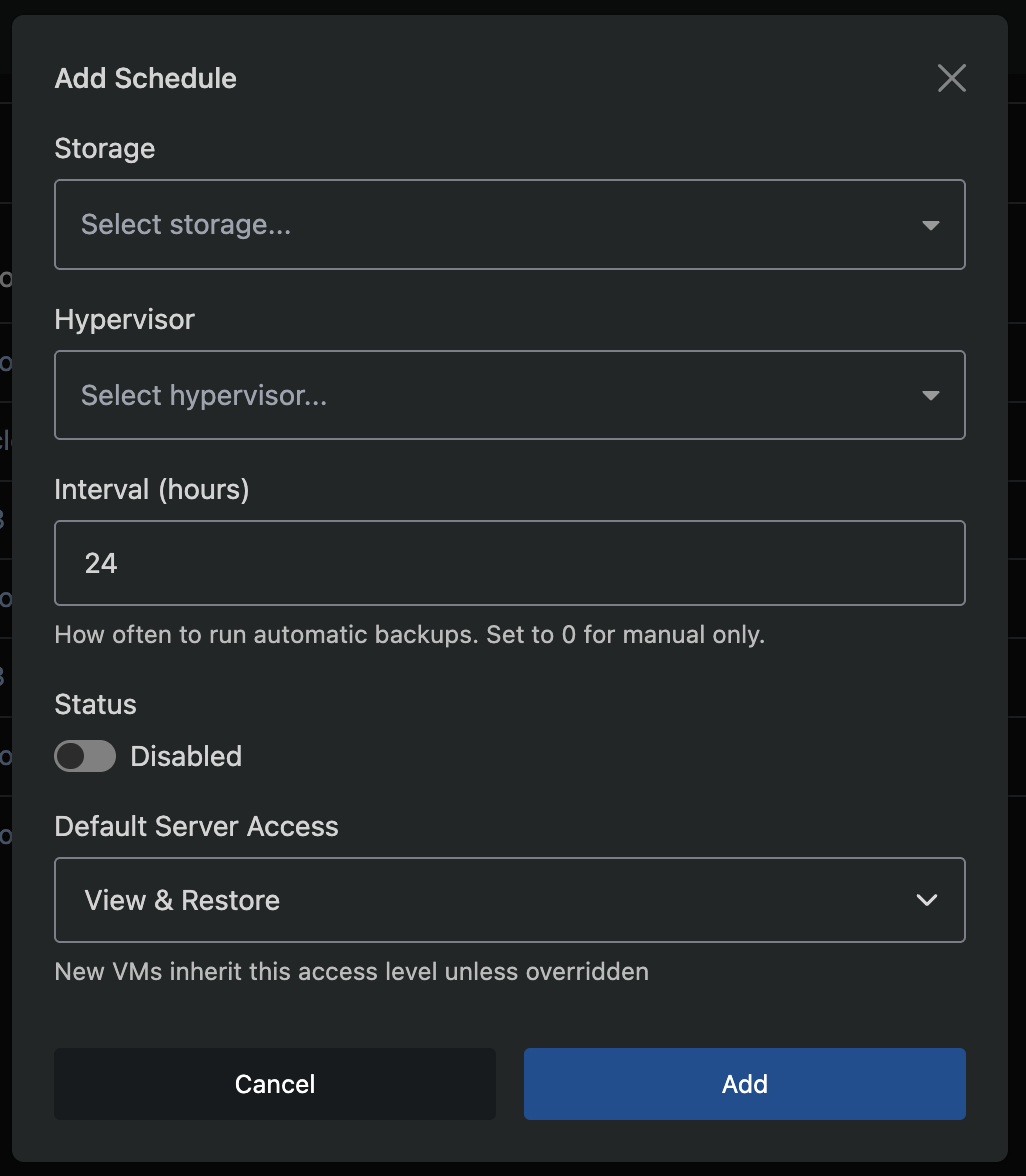
| Field | Description |
|---|---|
| Storage | The storage backend to use |
| Hypervisor | The hypervisor whose VMs will be backed up |
| Interval | Hours between backup runs (e.g. 24 for daily). Set to 0 for manual-only |
| Status | Enabled or Disabled |
| Default Server Access | Default access level for VMs on this schedule |
Each schedule pairs one hypervisor with one storage backend. Each hypervisor can only have one schedule. If you have 3 hypervisors backing up to 1 storage, create 3 schedules.
After creating the schedule, backups will begin automatically at the configured interval. The first backup for each VM is always a full backup.
Cloning a Schedule
To quickly apply the same configuration across multiple hypervisors, use the Clone option from a schedule's dropdown menu. Select the target hypervisors and click Clone - a new schedule is created for each one with identical settings (storage, interval, retention, resource controls, etc.). Hypervisors that already have a schedule are excluded automatically.
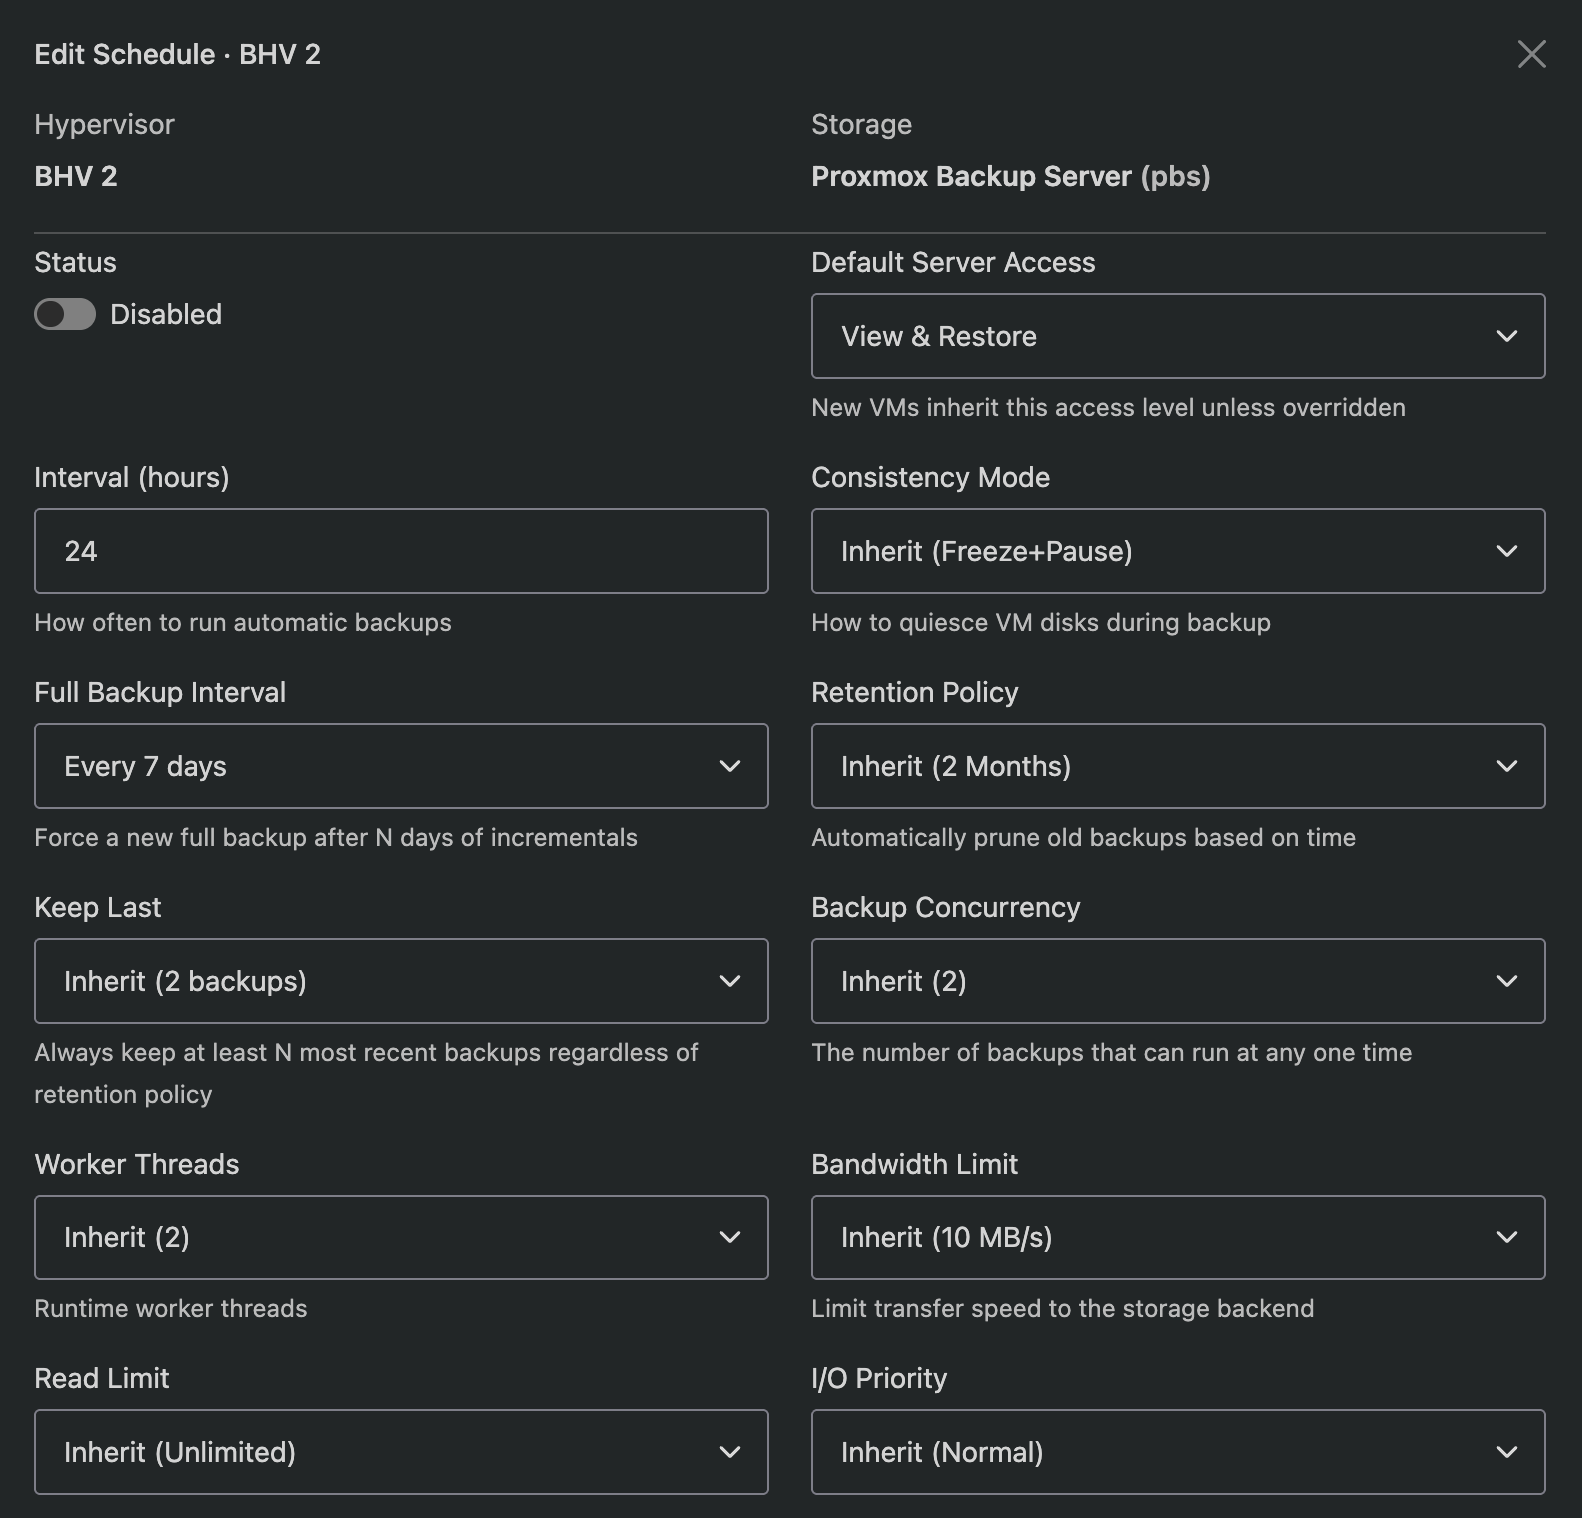
Schedule Overrides
Click the schedule row to expand it and see the resolved settings. Each setting shows whether it inherits from the storage default or has been overridden.
Click the edit icon to override any setting for this specific schedule:
- Interval, consistency mode, full backup interval
- Retention policy, keep last
- Backup concurrency, worker threads
- Bandwidth and read limits
- I/O and CPU priority
- Encryption (enable/disable/inherit)
- Bind address (source IP for outbound connections, not supported for S3 storage)
- Time window (restrict backups to specific hours)
Overridden settings show an orange badge. Inherited settings show a grey badge with the resolved value.
Time Windows
You can restrict a schedule to only run backups during specific hours. Set the Start and End times in the schedule edit modal. If the interval comes due outside the window, the backup waits until the next window opens.
Allowed Days
Restrict a schedule to specific days of the week. Click the day buttons in the schedule edit modal to toggle individual days on or off. When all days are selected (or none are toggled), the schedule runs any day. Common examples:
- Weekdays only - Mon, Tue, Wed, Thu, Fri
- Weekends only - Sat, Sun
- Alternate days - Mon, Wed, Fri
Allowed days work alongside time windows. For example, a schedule set to Mon/Wed/Fri with a 05:00-07:00 window will only run during those hours on those three days. The Next Runs Preview at the bottom of the edit modal shows the combined effect of the interval, time window, and allowed days so you can verify the schedule before saving.
Bind Address
If your hypervisors have multiple network interfaces (e.g. a public interface and a dedicated backup network), you can set a Bind Address to force all backup traffic through a specific IP address. Enter the local IP address on the hypervisor that should be used for connections to the storage backend. This applies to all operations - backups, restores, purges, and health checks.
| Backend | Bind Address Support |
|---|---|
| SSH/SFTP | |
| Proxmox Backup Server | |
| Rclone | |
| FTP/FTPS | |
| S3 |
S3 and FTP do not support bind address. For S3, use an rclone remote with an S3 backend instead (rclone supports bind), or configure OS-level routing as shown below.
If your storage backend does not support bind address, or you need to enforce routing at the OS level, you can use firewall rules to route backup traffic through a specific interface.
Example: route traffic to backup server 10.50.0.100 via interface eth1 (IP 10.50.0.1)
Using iptables:
# Route outbound traffic to the backup server through the backup interface
iptables -t nat -A POSTROUTING -d 10.50.0.100 -o eth1 -j SNAT --to-source 10.50.0.1

# Ensure traffic to the backup server uses the correct route
ip route add 10.50.0.100/32 via 10.50.0.1 dev eth1
Using UFW (add to /etc/ufw/before.rules, before the *filter section):
*nat
:POSTROUTING ACCEPT [0:0]
-A POSTROUTING -d 10.50.0.100 -o eth1 -j SNAT --to-source 10.50.0.1
COMMIT
Then reload UFW:
ufw reload
OS-level routing applies to all traffic destined for the backup server, not just backups. This is the recommended approach when using S3 storage with a dedicated backup network.
Manual-Only Schedules
Setting a schedule's interval to 0 creates a manual-only schedule. No automatic backups are dispatched for this schedule. VMs on the schedule can still be backed up and restored on demand (via the admin or end-user interface, depending on access level), and all other schedule settings (storage, encryption, retention, resource controls) still apply.
This is useful when you want to:
- Define storage and retention settings for a group of VMs without automated backups
- Allow end users with Full Access or Manual Only access to trigger their own backups on their own schedule
- Keep a schedule configured but temporarily stop automated runs without disabling it entirely
Managing Server Access Levels
Click the server count badge on a schedule row to open the Manage Servers modal. This lists all commissioned VMs on the hypervisor with their current access level.
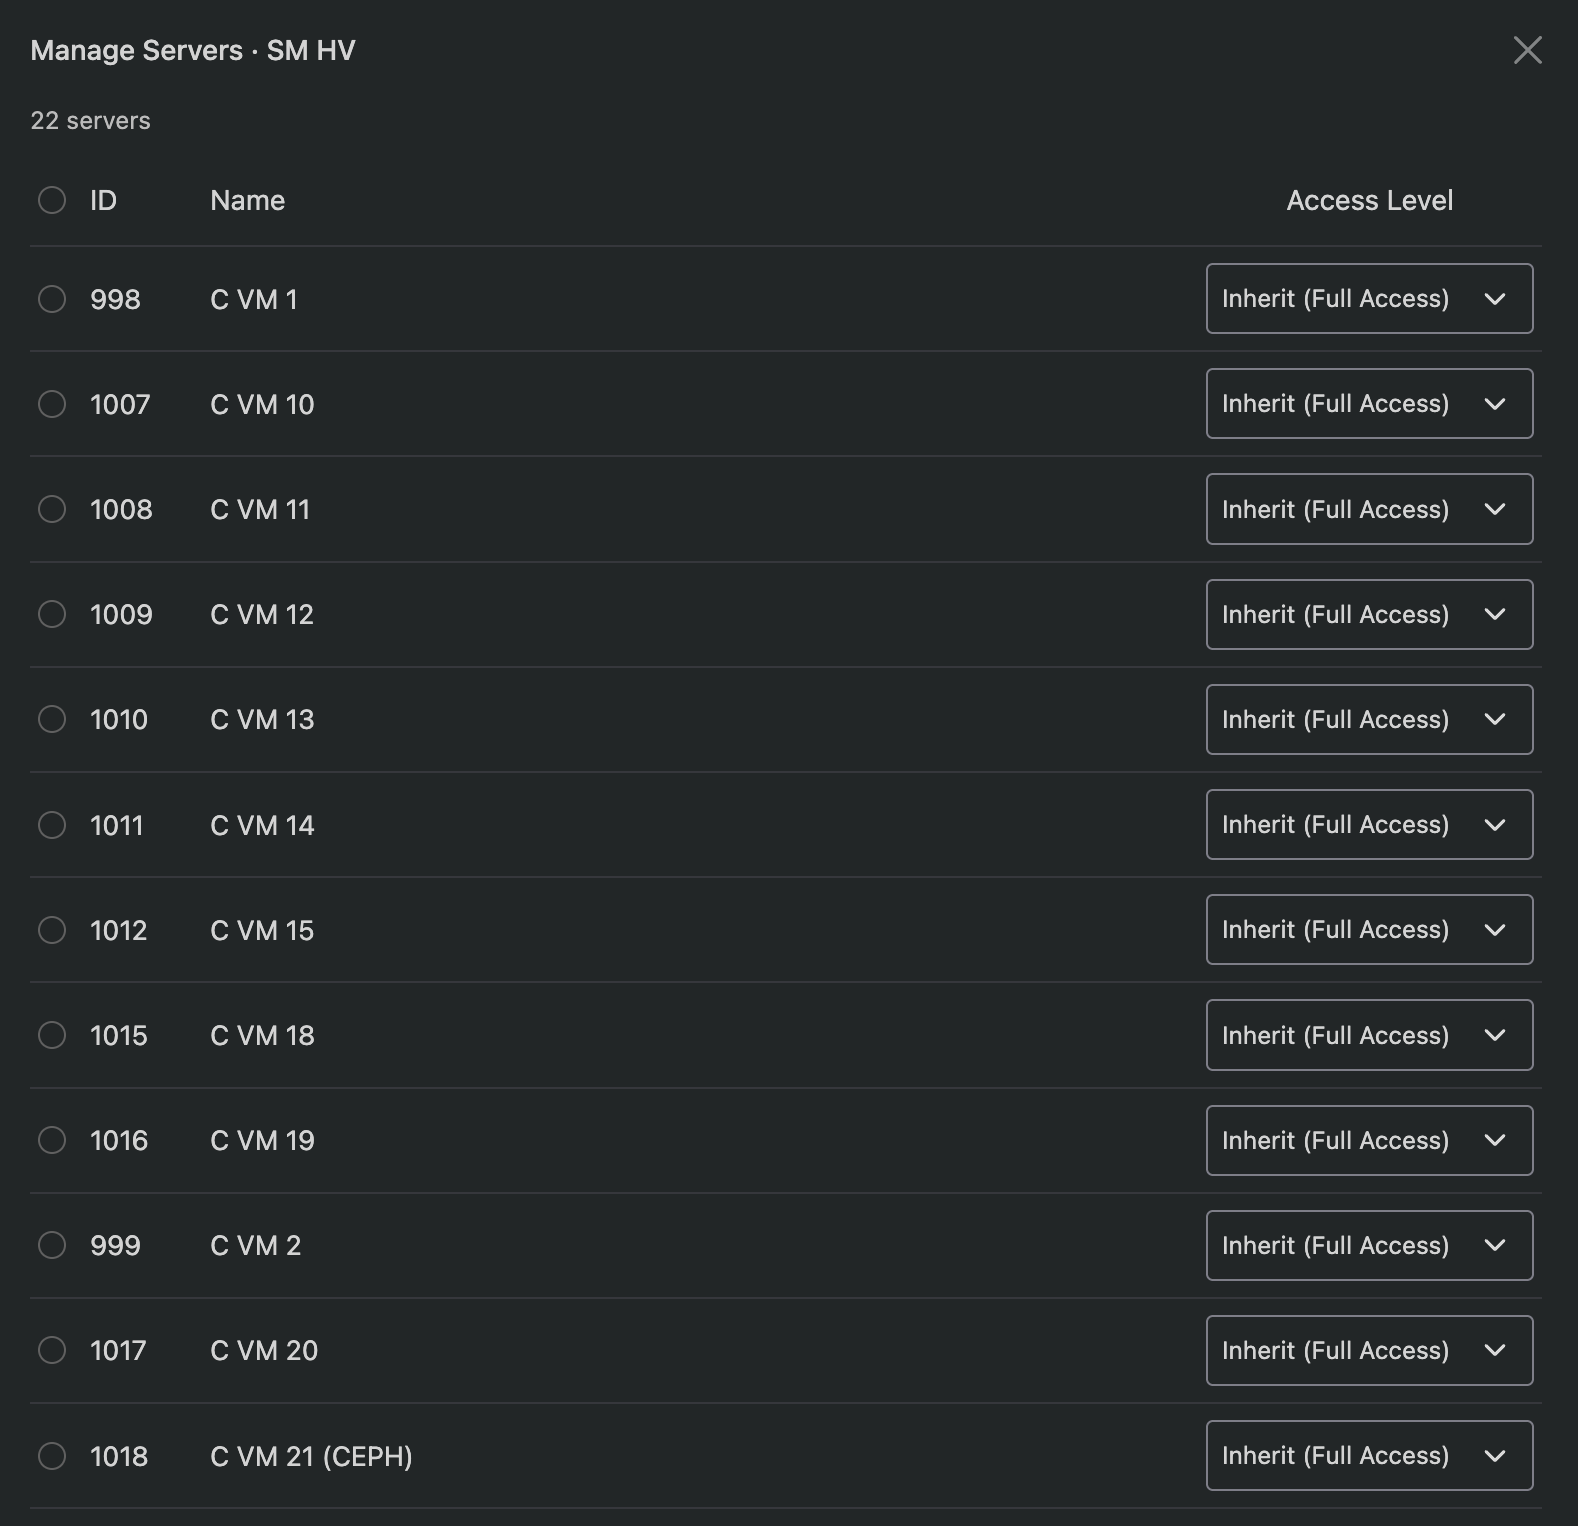
You can set per-server overrides or use the bulk action to change multiple VMs at once. The "Inherit" option uses the schedule's default access level.
Overview
The Overview (Backup Manager → Overview) provides an at-a-glance overview of your backup infrastructure.
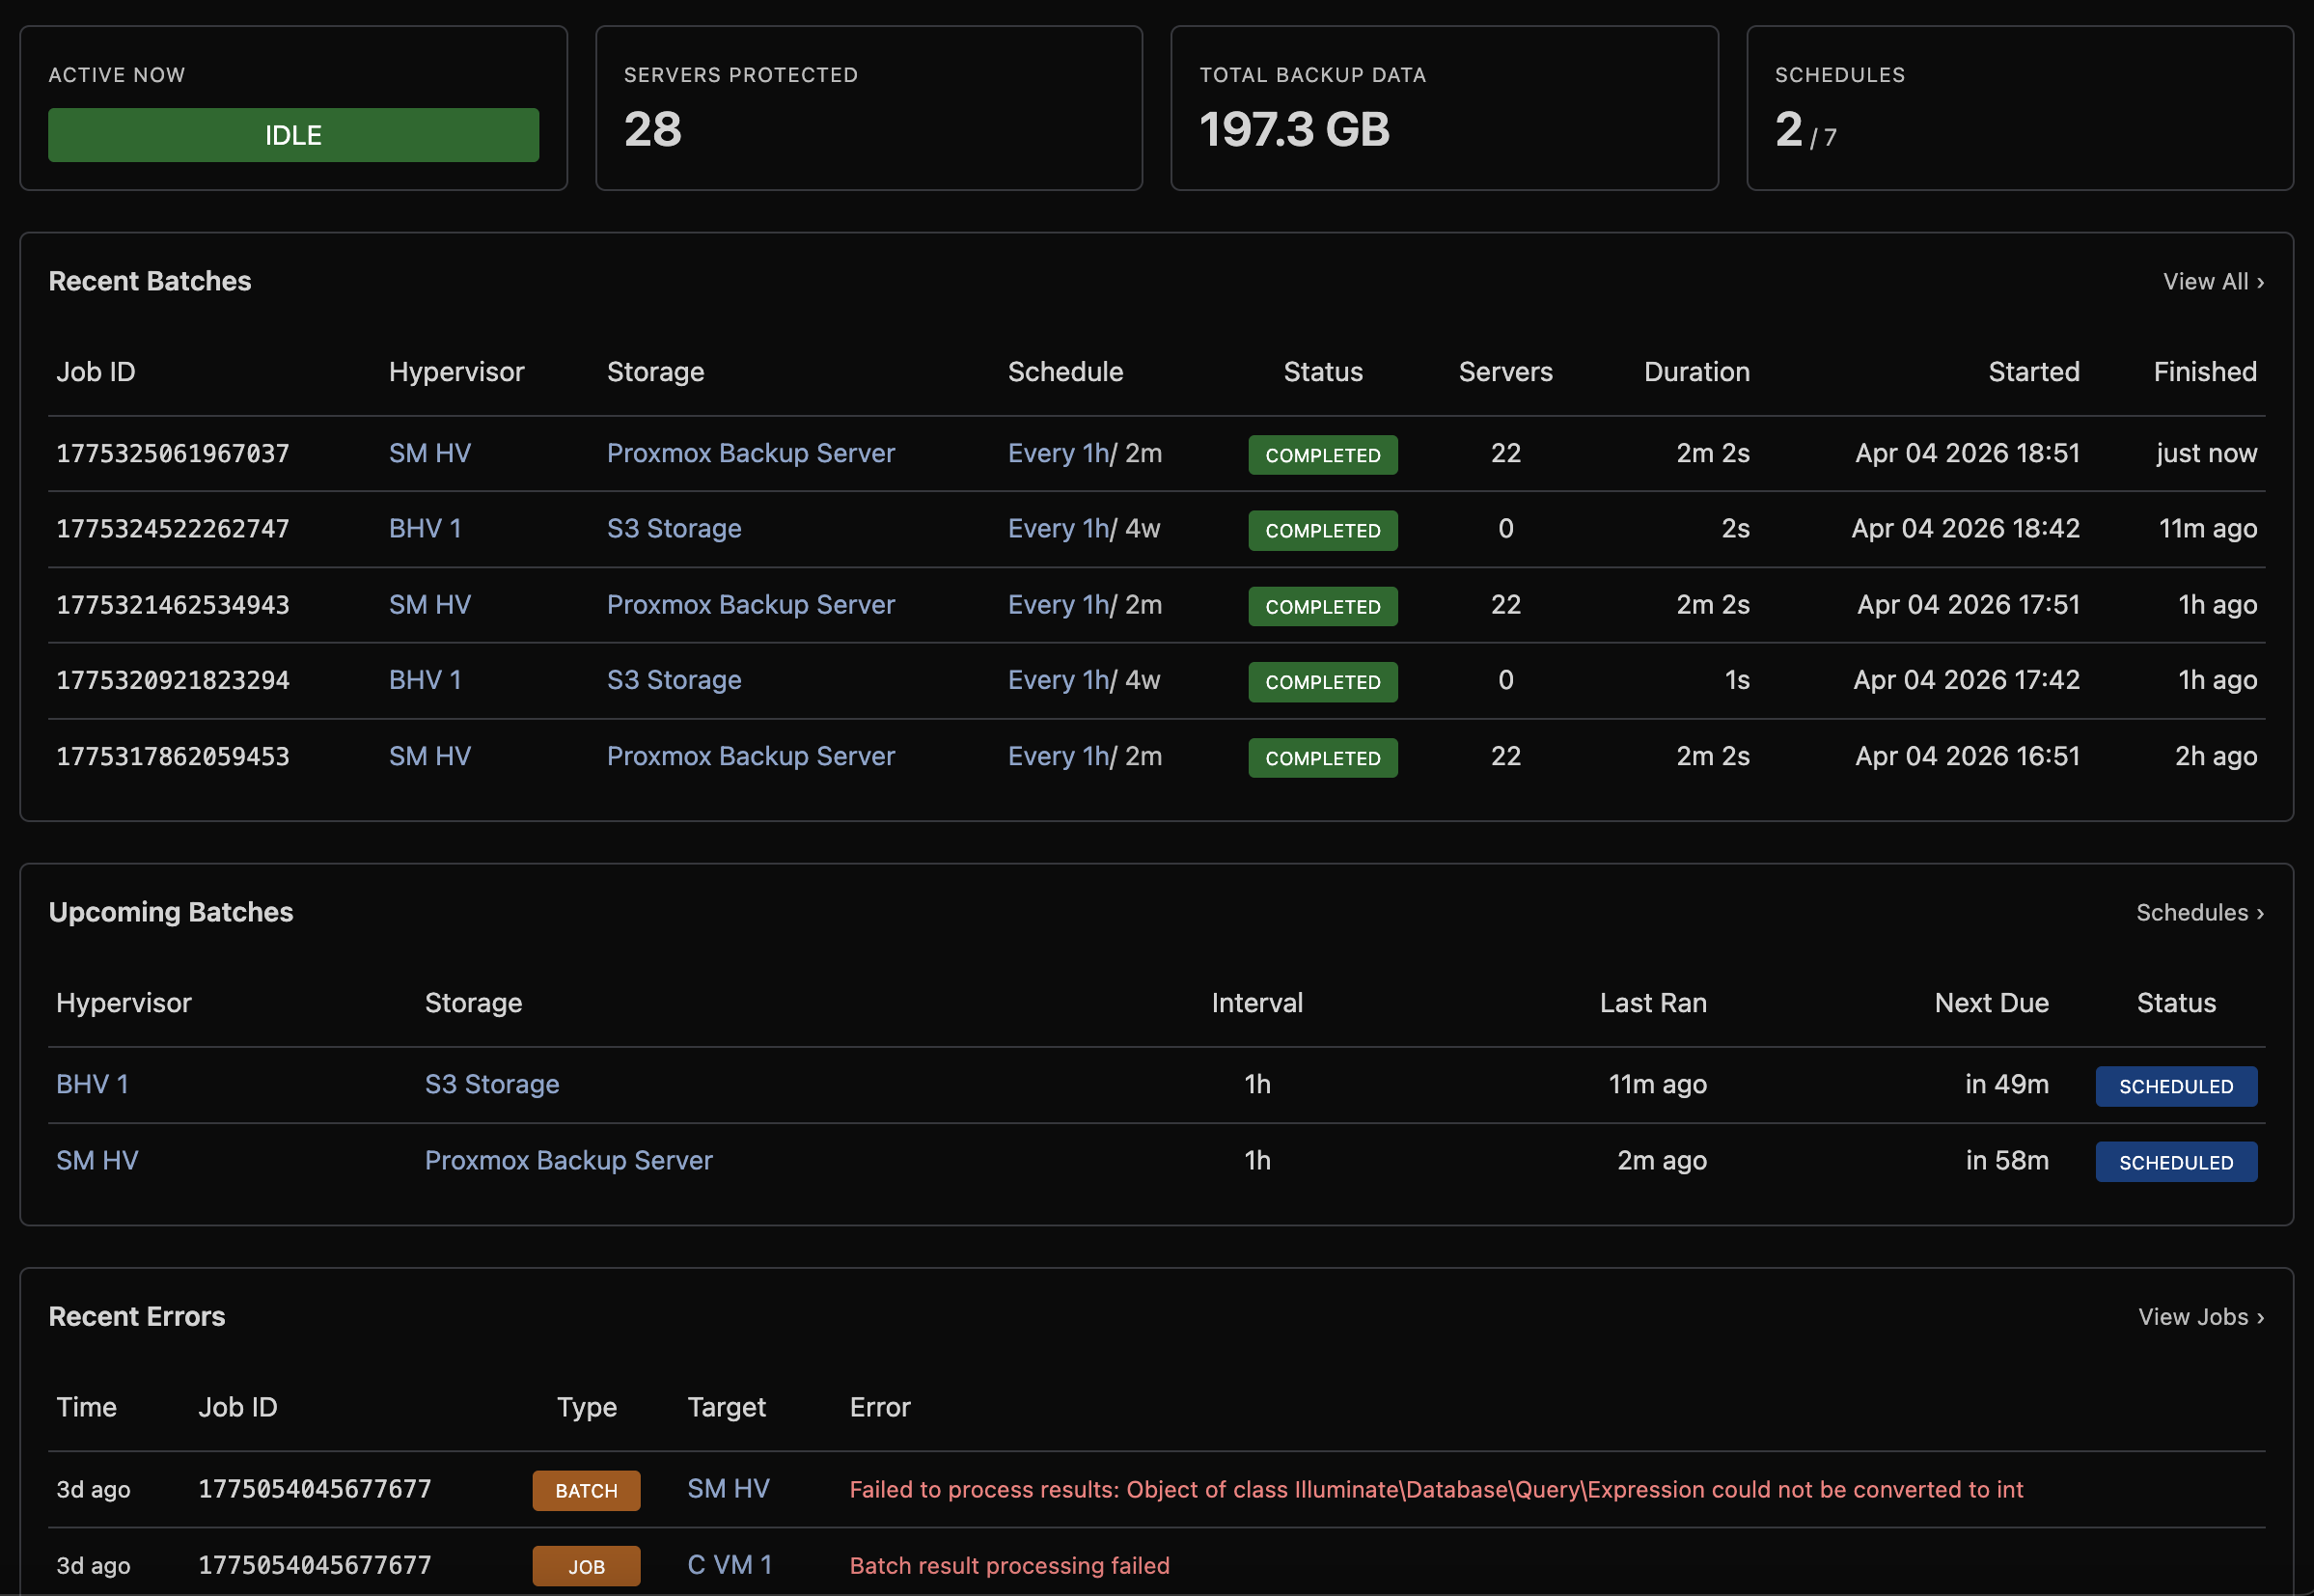
Status Cards
| Card | Description |
|---|---|
| Active Now | Currently running batch or single backup jobs |
| Servers Protected | Count of VMs with at least one backup |
| Total Backup Data | Aggregate backup size across all storage |
| Schedules | Enabled vs total schedule count |
Recent Batches
Shows the most recent scheduled backup runs with status, server count, and duration.
Upcoming Batches
Shows when the next scheduled run is due for each schedule, with overdue warnings.
Recent Errors
Lists recent failures across all jobs with the error message, making it easy to spot issues.
VM Health
| Card | Description |
|---|---|
| Failing Servers | VMs with consecutive backup failures |
| Never Backed Up | VMs that have never been successfully backed up |
| Pending Purge | Deleted VMs awaiting backup data cleanup |
Storage Summary
Overview of each storage backend showing health status, disk usage, backup count, and the time of the last backup.
Scheduling and Resource Control
The Backup Manager is designed to keep backup operations from impacting virtual server performance, even on heavily loaded hypervisors with hundreds of VMs.
One Batch at a Time
Each hypervisor runs at most one batch backup at a time. When a scheduled interval comes due, the system checks whether the hypervisor already has a running batch. If it does, the new batch is deferred until the current one completes. This prevents backup I/O from stacking up and overwhelming storage or network resources.
Single-VM operations (on-demand backups, restores, purges) are also mutually exclusive with batch backups:
| Running | Attempted | Result |
|---|---|---|
| Batch backup | Single backup/restore | Queued until batch completes |
| Single backup/restore | Batch backup | Batch deferred to next cycle |
| Single backup | Another single backup (same VM) | Rejected - one operation per VM |
This means a user triggering a manual backup will never compete with a scheduled batch for the same hypervisor's resources, and two users cannot accidentally run simultaneous restores on the same VM.
VM Concurrency
Within a batch, the Backup Concurrency setting controls how many VMs are backed up in parallel on a single hypervisor. The default is 1 (sequential). Higher values complete batches faster but increase disk I/O and network load.
For most deployments, a concurrency of 1-2 is recommended. On hypervisors with fast NVMe storage and dedicated backup network interfaces, higher values (3-4) can be used safely.
I/O and CPU Priority
Each storage backend (or schedule override) can set I/O and CPU priority levels for the backup process:
| Priority | I/O Effect | CPU Effect |
|---|---|---|
| Normal | Standard scheduling | Standard scheduling |
| Low | Best-effort low priority | Nice +10 |
| Idle | Only uses spare I/O bandwidth | Nice +19 (lowest) |
Setting I/O priority to Idle ensures backups only consume disk bandwidth that VMs are not using. This is the safest option for production hypervisors under heavy load, though backups may take significantly longer.
Bandwidth and Read Limits
Two rate limits control how fast data moves during a backup:
| Setting | Controls | Use Case |
|---|---|---|
| Bandwidth Limit | Upload speed to storage | Prevent saturating the network link to your backup server |
| Read Limit | Disk read speed on the hypervisor | Prevent backup reads from starving VM disk I/O |
Both limits can be set per storage or overridden per schedule. When both are set, the slower of the two is the effective bottleneck.
Time Windows & Allowed Days
Schedules can be restricted to only run during specific hours (e.g. 01:00-06:00). If a backup interval comes due outside the time window, it waits until the window opens. This allows you to confine backup I/O to off-peak hours.
Schedules can also be restricted to specific days of the week (e.g. weekdays only, or Mon/Wed/Fri). When both a time window and allowed days are configured, the schedule only dispatches when both conditions are met. See Allowed Days for configuration details.
Stale Job Protection
If a batch or single job stops responding (hypervisor reboot, network partition, storage outage), the system automatically detects and cleans it up:
- Batch jobs: cancelled after 48 hours or 3× the schedule interval (whichever is shorter)
- Single jobs: cancelled after 24 hours
This prevents phantom "running" jobs from blocking future backups indefinitely.
Performance Tuning
Understanding how each setting affects hypervisor load and backup speed helps you find the right balance for your environment.
Worker Threads
Worker threads control how many operations (network uploads, disk reads, frame processing) can execute in parallel within a single VM backup.
| Value | Effect |
|---|---|
| 1 | Single-threaded - minimal CPU usage, suitable for low-spec hypervisors |
| 2-4 (default: 4) | Good balance for most deployments |
| 8+ | Diminishing returns unless storage backend is very fast and disks are large |
Worker threads are shared across all concurrent VM backups on the hypervisor. If you set Backup Concurrency to 3 and Worker Threads to 4, the hypervisor uses 4 threads total (not 12). Each concurrent VM shares the thread pool, so higher concurrency benefits from more workers.
Compression
Compression is enabled by default using zstd. Two settings control its behaviour:
Compression Level (1-19, default: 3)
| Level | Speed | Ratio | Use Case |
|---|---|---|---|
| 1 | Fastest | ~2-3x | Fast storage, bandwidth is not a concern |
| 3 (default) | Fast | ~3-4x | Good balance for most setups |
| 6-9 | Moderate | ~4-5x | Slow or metered network links |
| 10-19 | Slow | ~5-6x | Rarely worthwhile - significant CPU cost for marginal gain |
Higher levels use exponentially more CPU time per frame. Level 3 typically compresses at 500+ MB/s per thread, while level 9 may drop to 100-200 MB/s per thread. The compression ratio improvement above level 6 is marginal for most VM disk images.
Compression Threads (default: 1)
Controls how many frames are compressed in parallel. Each thread compresses one 4 MB frame independently.
| Threads | Effect |
|---|---|
| 1 (default) | Sequential compression - lowest CPU usage, simple pipeline |
| 2-4 | Parallel compression - useful when compression is the bottleneck (high compression level or fast storage) |
| 8+ | Only useful at high compression levels with very fast network and disk I/O |
When Compression Threads is 1, the pipeline is: read frame, compress, upload (sequential). When greater than 1, frames are read ahead and compressed in parallel, then reordered for upload. This overlaps I/O with compression but increases CPU and memory usage proportionally.
When to increase compression threads: If your backup speed is limited by CPU (check with top during a backup - if the backup process is near 100% CPU on one core), increasing threads will help. If your backup is limited by disk read speed or network upload, adding threads will not help and just wastes CPU.
Encryption Overhead
When encryption is enabled (ChaCha20-Poly1305), each compressed frame is encrypted and authenticated before upload. The overhead is:
- CPU: Minimal. ChaCha20 operates at 2-4 GB/s per core on modern x86 hardware - it will never be the bottleneck
- Size: 28 bytes per frame (12-byte nonce + 16-byte authentication tag). Negligible for 4 MB frames
- Incompressibility: Encrypted data cannot be deduplicated by the storage backend. This only matters for PBS, where server-side deduplication works on the raw chunk data. For all other backends, there is no difference
Enabling encryption with PBS storage disables PBS server-side deduplication. Each backup will consume its full size on the PBS server rather than only storing changed chunks. Consider whether encryption or deduplication is more important for your use case.
Backup Concurrency
Controls how many VMs are backed up simultaneously on a single hypervisor during a batch. Each concurrent VM runs its own NBD export + read + compress + upload pipeline.
| Concurrency | Disk I/O | Network | Memory | Recommended For |
|---|---|---|---|---|
| 1 (default) | Low | Low | ~50 MB | Shared storage, busy hypervisors |
| 2 | Moderate | Moderate | ~100 MB | Dedicated backup network, SSD storage |
| 3-4 | High | High | ~150-200 MB | NVMe storage, dedicated backup network, fast storage backend |
| 5+ | Very High | Very High | ~250+ MB | Not recommended for most deployments |
Memory usage per VM depends on compression threads (each thread buffers ~4 MB frames) and the number of disks being backed up.
Practical Examples
Low-impact production hypervisor (minimise disruption to VMs):
- Backup Concurrency: 1
- Worker Threads: 2
- Compression Level: 3
- Compression Threads: 1
- I/O Priority: Idle
- CPU Priority: Low
- Read Limit: 50 MB/s
Fast overnight backups (complete batches quickly during maintenance window):
- Backup Concurrency: 3
- Worker Threads: 4
- Compression Level: 1
- Compression Threads: 2
- I/O Priority: Normal
- CPU Priority: Normal
- No read or bandwidth limits
- Time Window: 01:00 - 06:00
Metered or slow network link (minimise bandwidth usage):
- Backup Concurrency: 1
- Worker Threads: 4
- Compression Level: 6
- Compression Threads: 2
- Bandwidth Limit: 25 MB/s
Monitoring
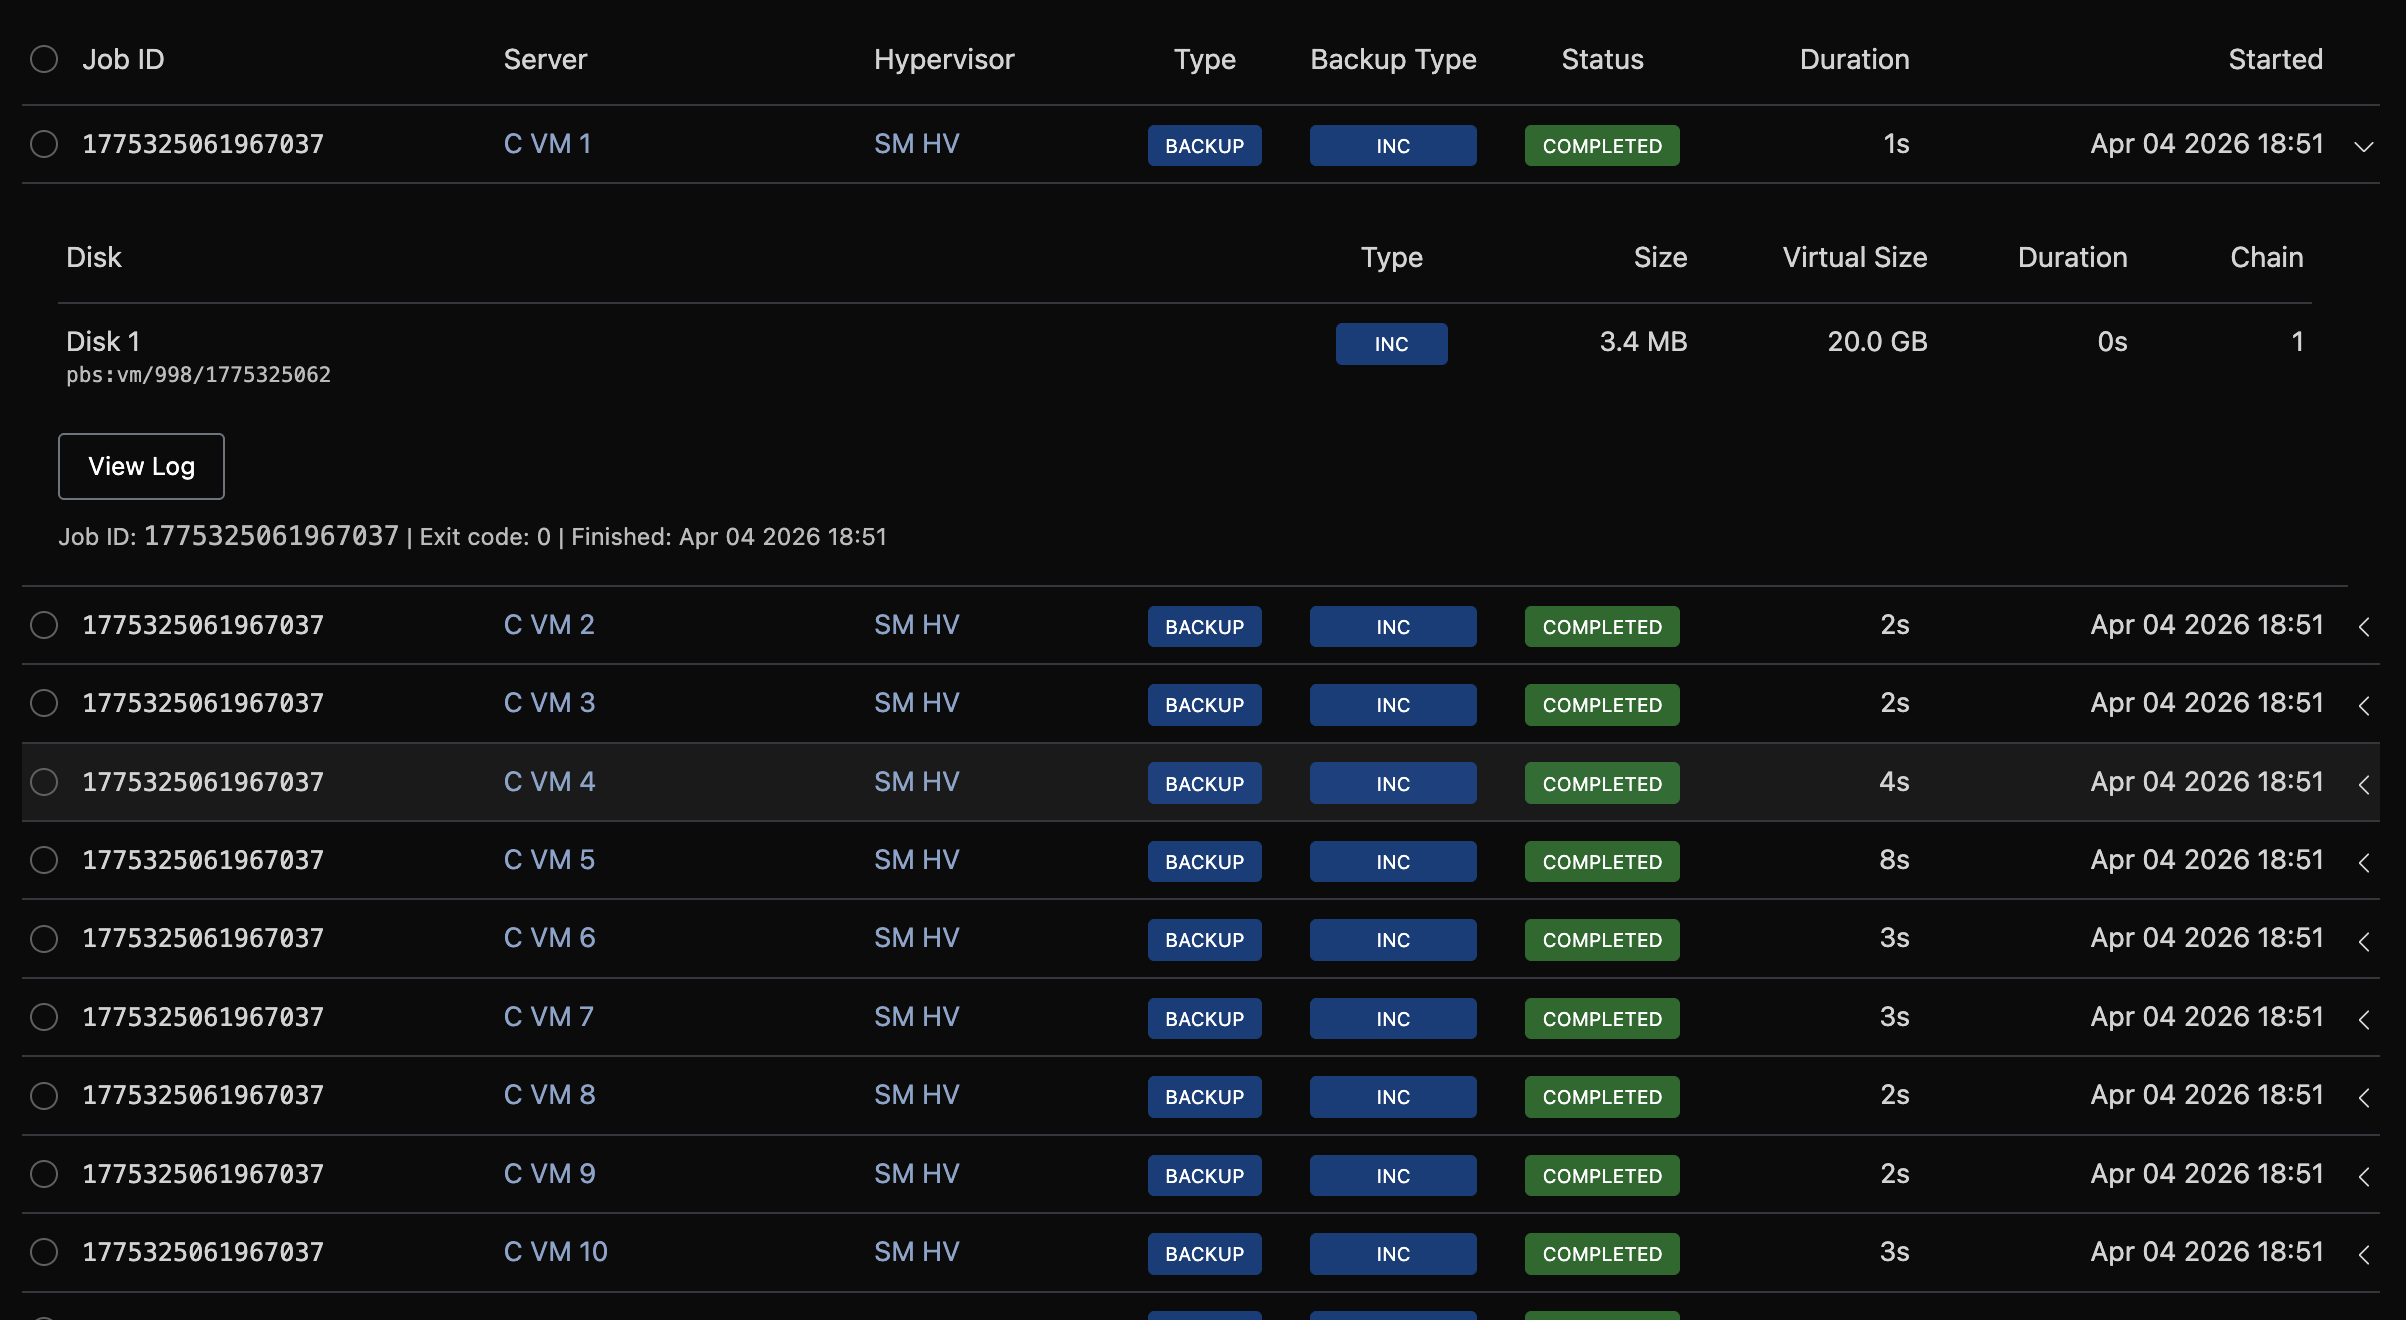
Batches
Navigate to Backup Manager → Batch Jobs to see the history of scheduled backup runs.
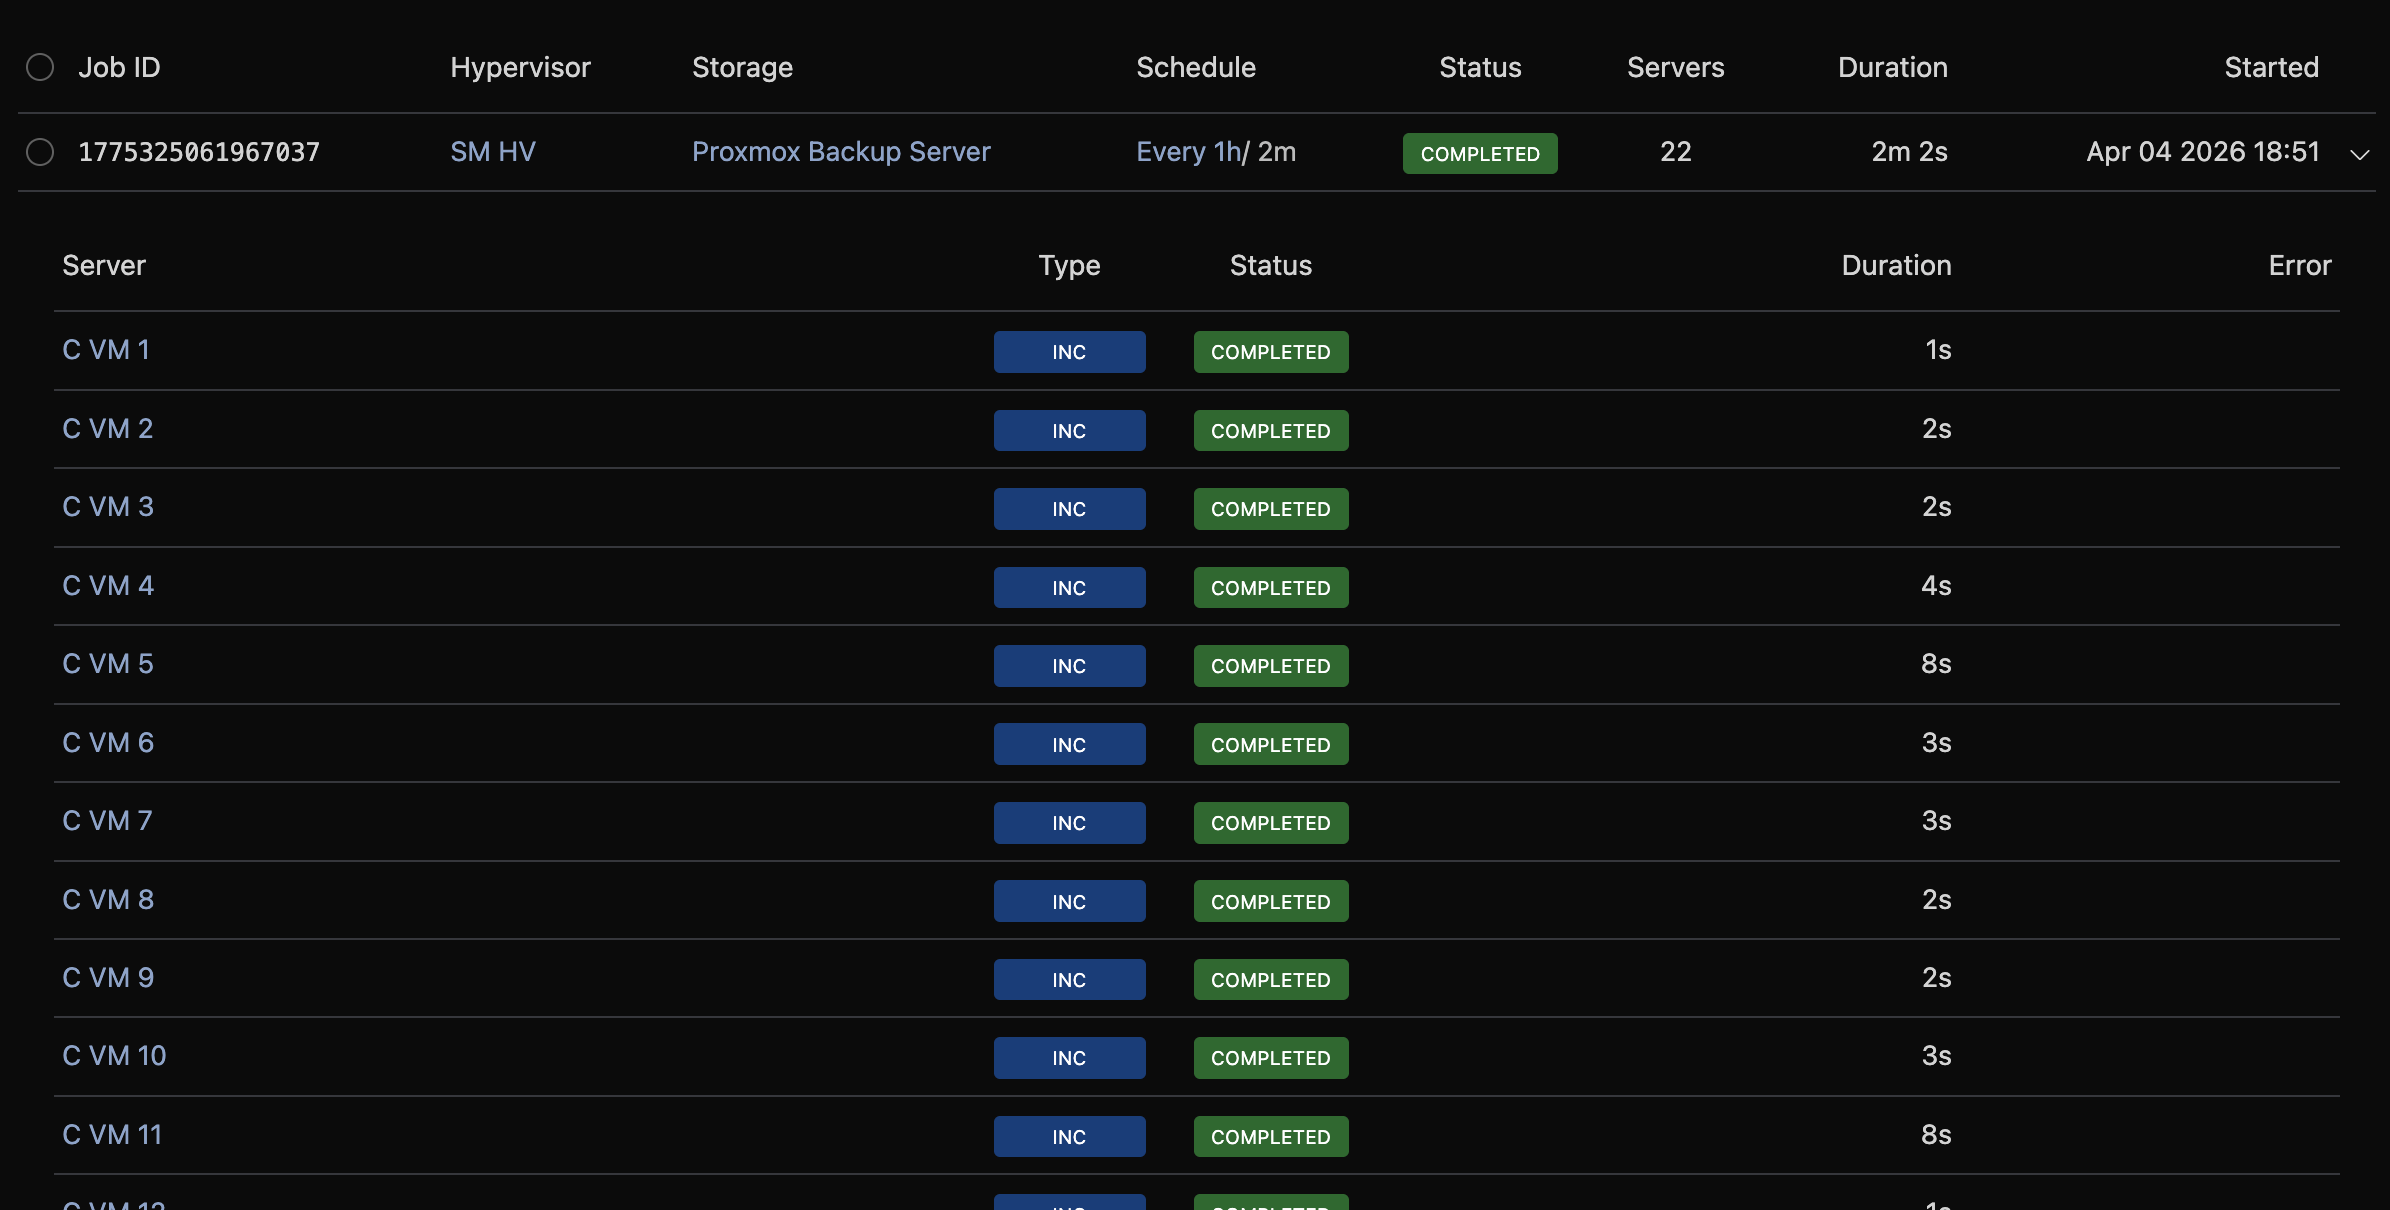
Each batch represents one scheduled run across all VMs on a hypervisor. Click a row to expand it and see:
- Per-VM job status (completed, failed, pending)
- Progress bar for running batches
- Error details for failed VMs
- Full log output (click View Log)
Filter by status, job ID, schedule, or date range.
Jobs
Navigate to Backup Manager → Jobs to see individual operations (backups, restores, and purges).
Click a row to expand it and see:
- Progress details for running jobs (stage, bytes transferred, per-disk status)
- Per-disk results for completed backups (size, duration, chain)
- Error details for failures
- Log output
Filter by status, type, server name, job ID, or date range.
Cancelling Jobs
Running backup and restore operations can be cancelled from the Jobs, Batch Jobs, or per-server Backup Tree pages. Click the Cancel button on a running job or batch and confirm.
Cancelled jobs are marked with an orange "cancelled" badge. Cancellation sends a termination signal to the hypervisor - the backup process stops and any partially written data is cleaned up.
Backups
Navigate to Backup Manager → Backups to browse all backup records across every server and storage.
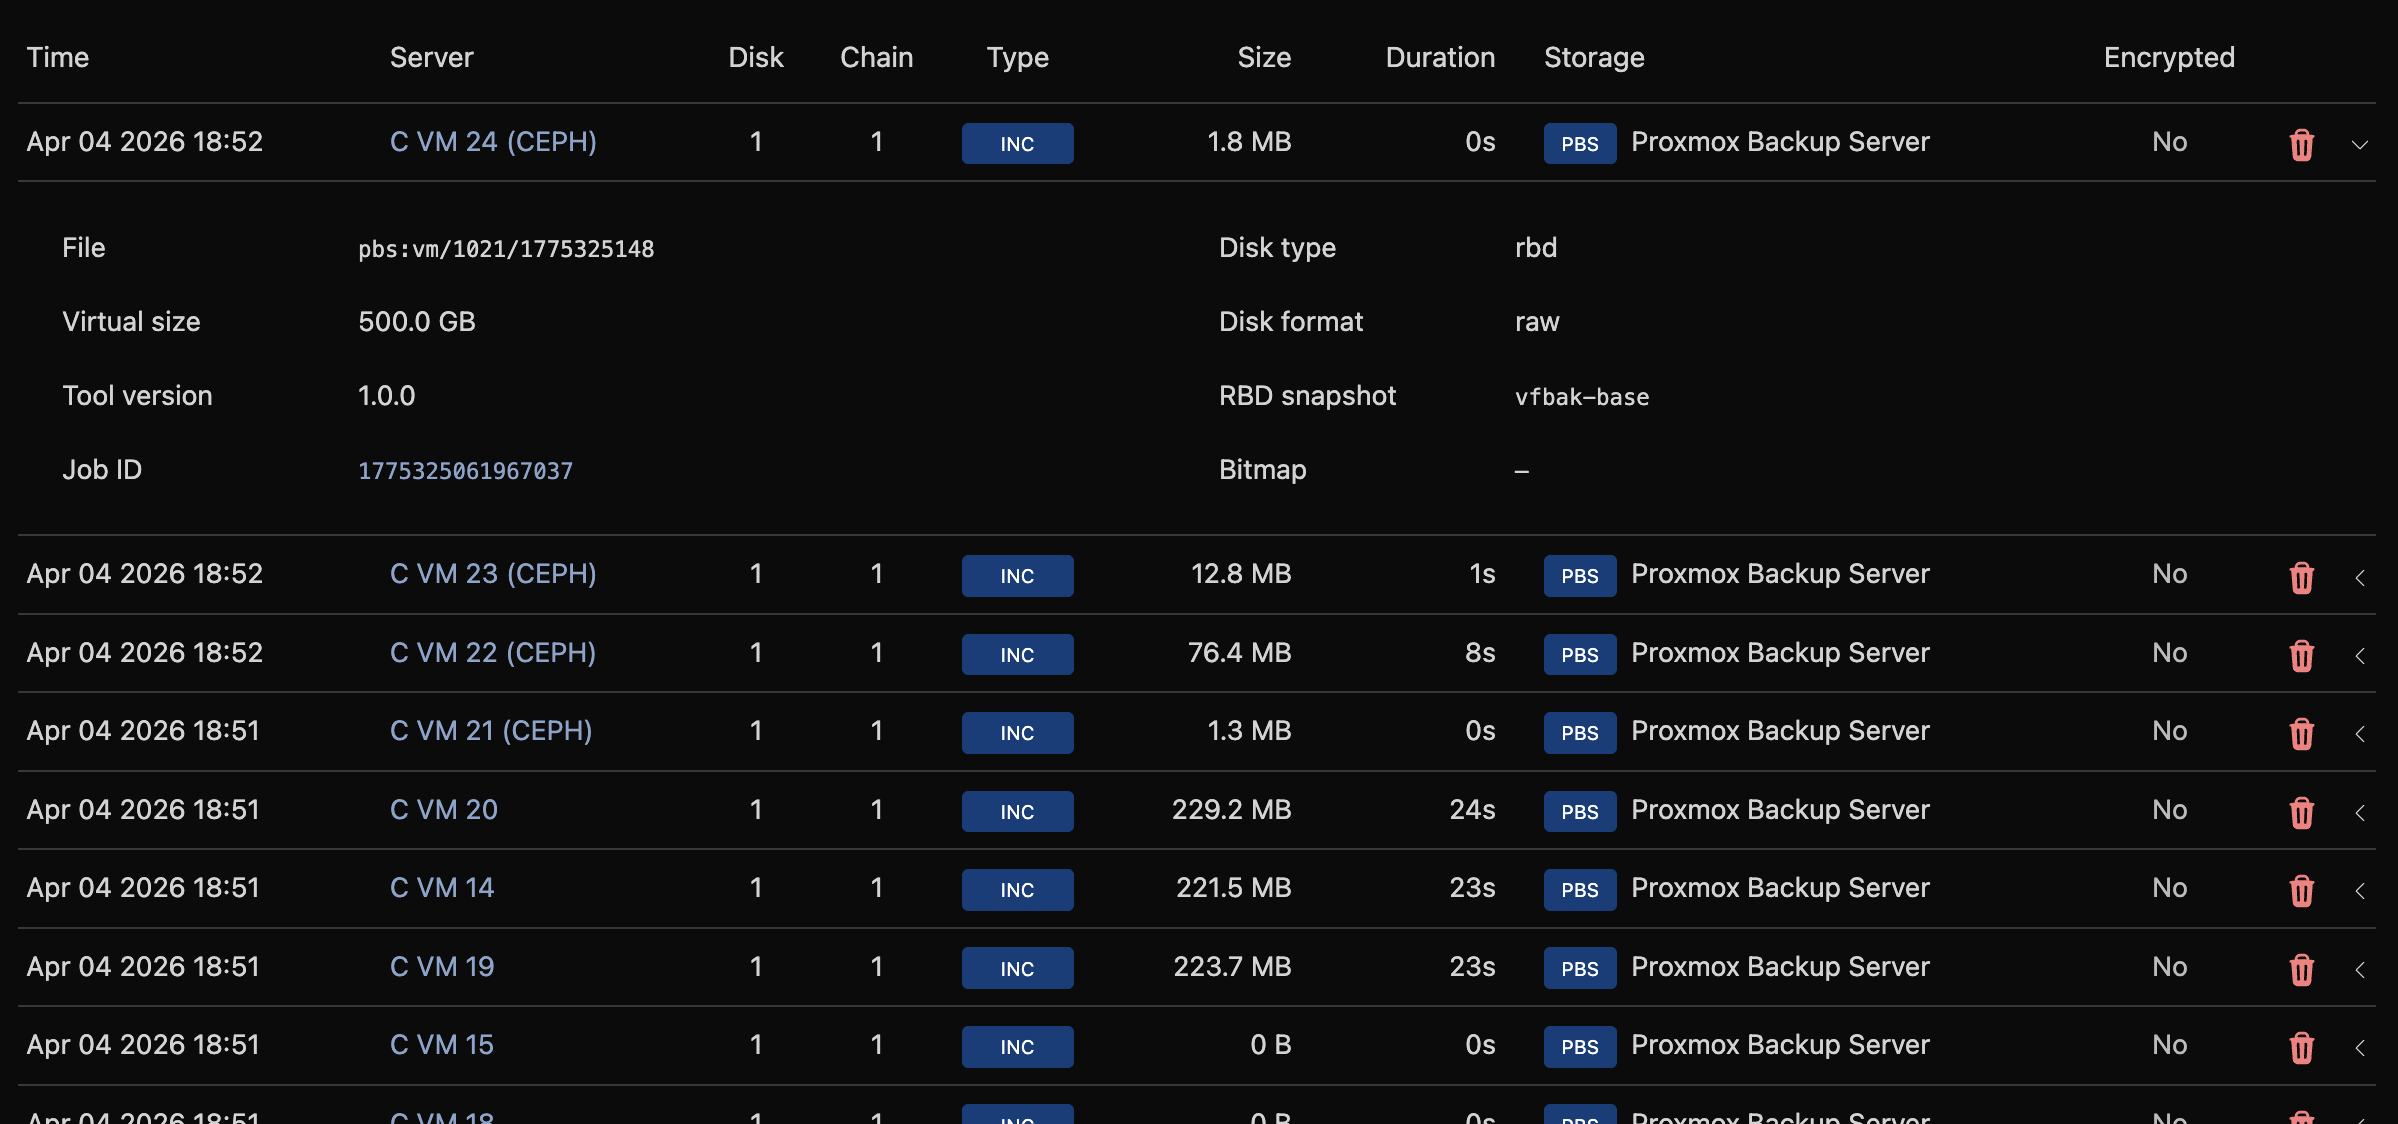
Click a row to expand and see full record details: file path, virtual size, SHA-256 hash, compression, and encryption status.
Filter by backup type, encryption status, server name, storage, or date range.
System Logs
Navigate to Backup Manager → System Logs to see internal dispatcher and subsystem log entries.
Each log entry includes a timestamp, severity level, source subsystem, and message. Related entities (schedule, storage, hypervisor, server, batch) are linked when available.
Filter by level (info, warn, error), source (dispatcher, inventory, purge, health, prune, heal), free-text search, or any combination of schedule/storage/hypervisor/server/batch ID and date range.
Info-level messages are only written when Log Info Level is enabled in Global Settings. With it disabled, only warnings and errors appear.
Per-Server Management
On a server's admin page, under the Backup tab, the Backup Manager section shows the backup tree for that VM.
Access Level
Set the access level for this specific VM using the dropdown. "Inherit" uses the schedule's default.
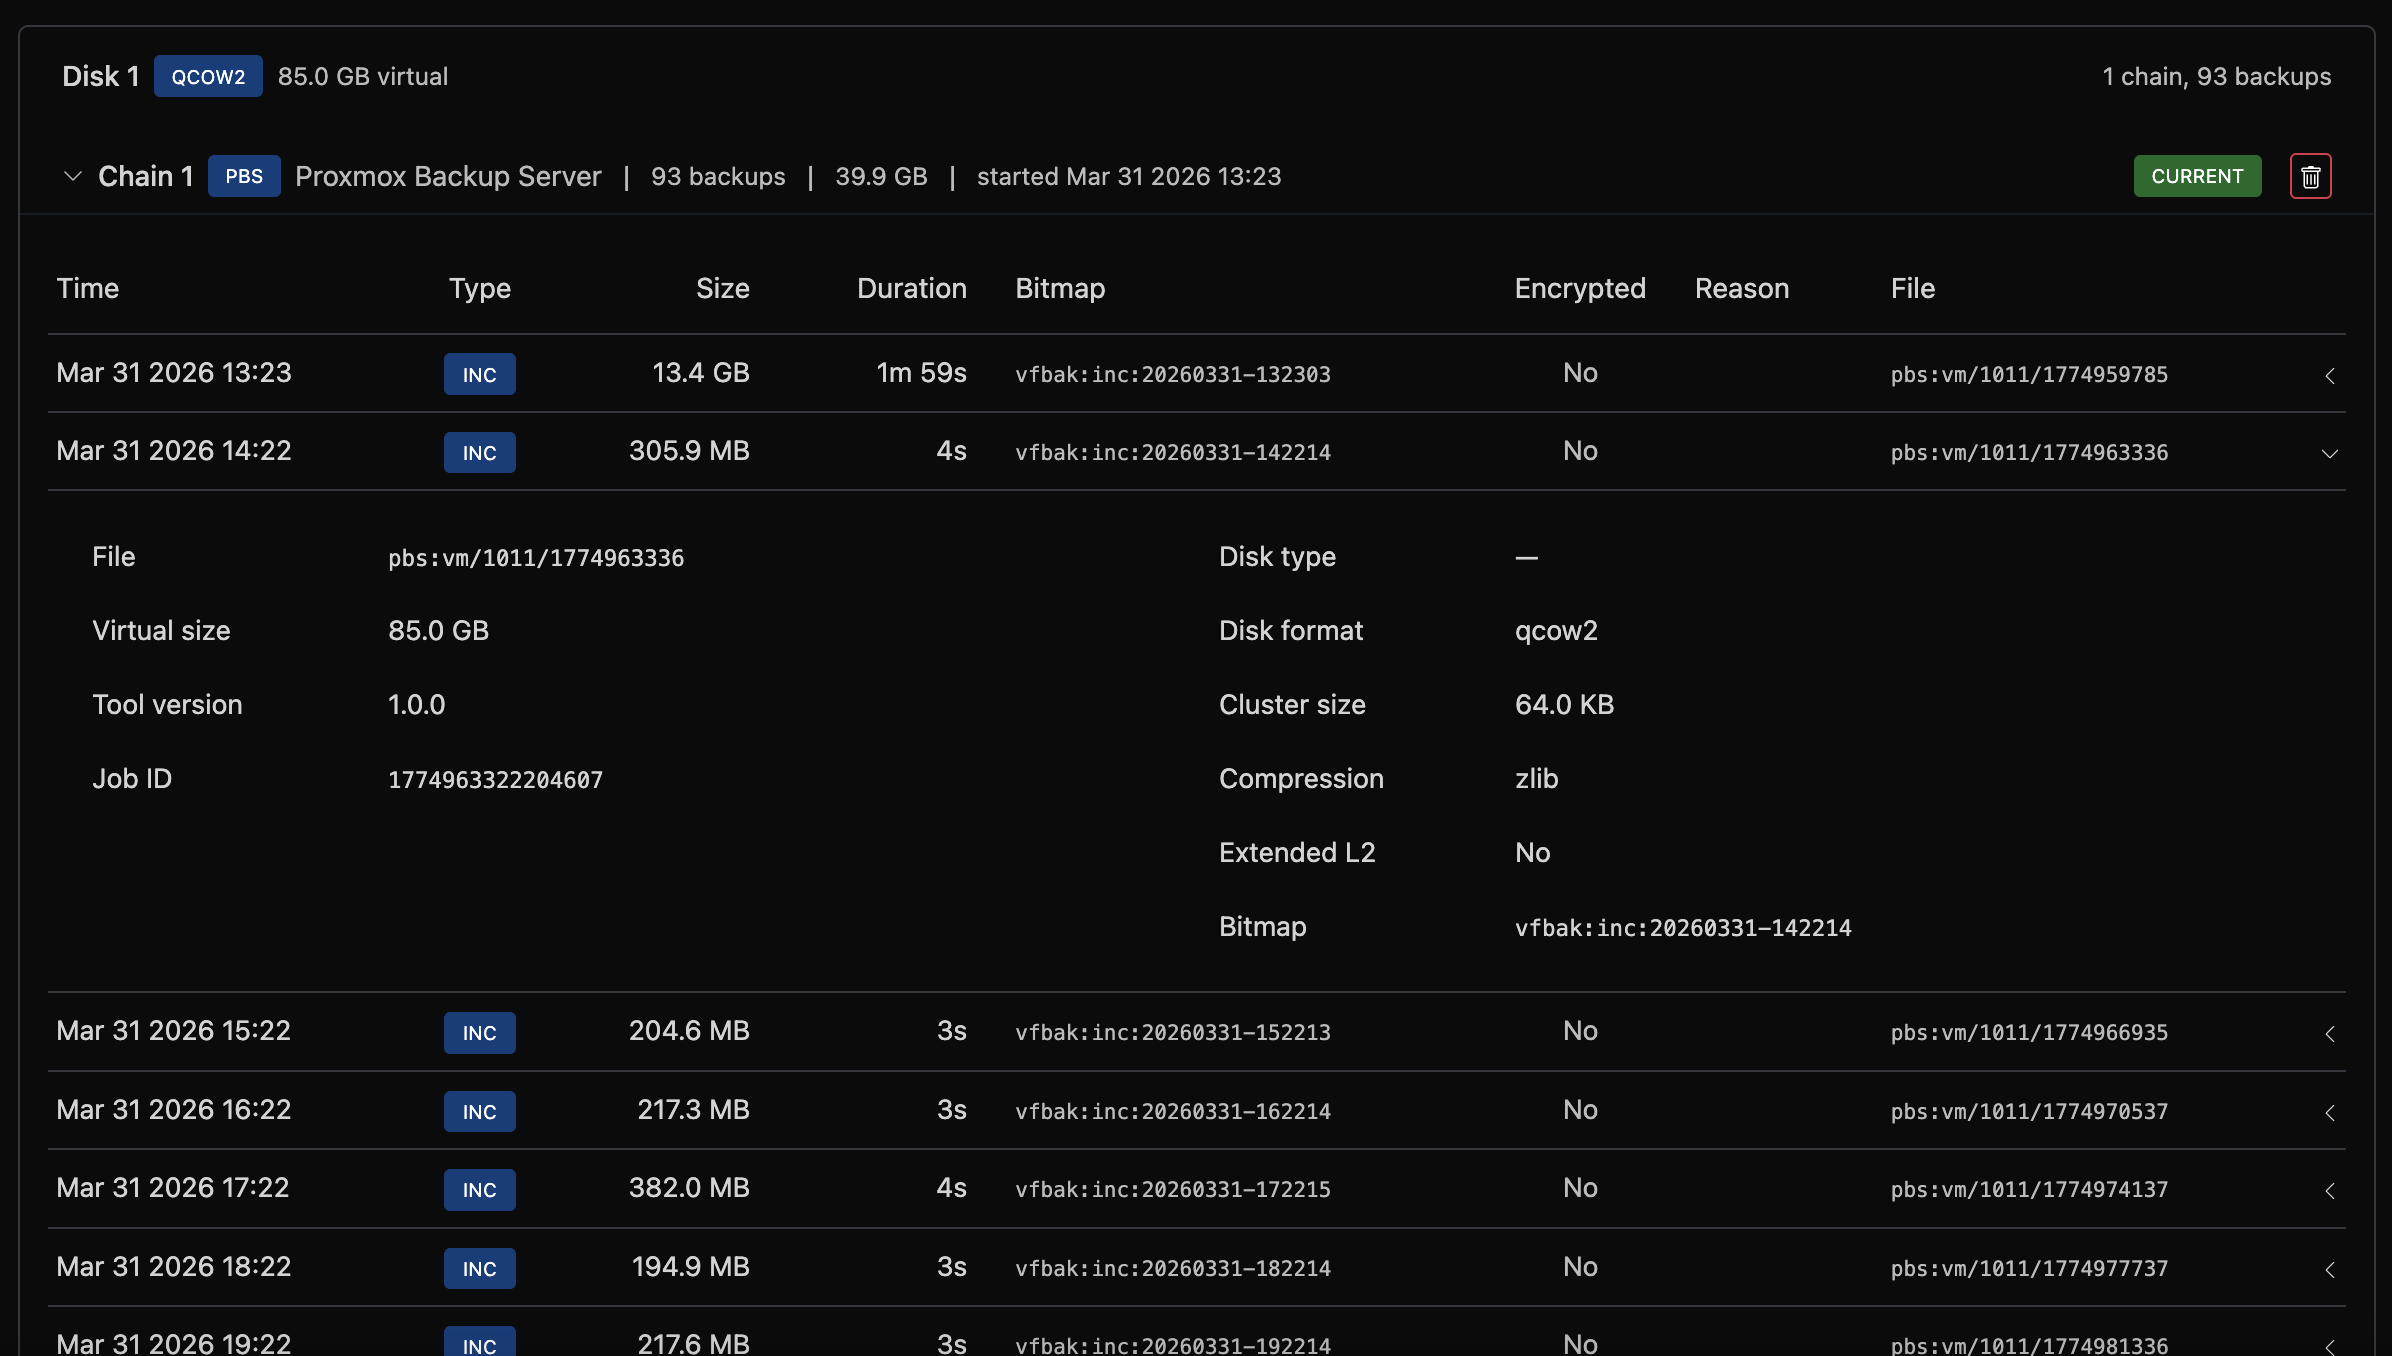
Backup Tree
Backups are displayed in a hierarchical tree:
- Disk: each virtual disk (disk 0, disk 1, etc.)
- Chain: a sequence of backups starting from a full backup
- Backup records: individual full, incremental, or differential backups
- Chain: a sequence of backups starting from a full backup
Each chain shows the storage backend, backup count, total size, and start date. The most recent chain is marked as "current."
Backup Now
Click Backup Now to trigger an immediate backup of this VM. The backup type (full or incremental) is determined automatically based on the chain state.
A progress banner appears showing the current stage, bytes transferred, and percentage complete.
Restore from Backup
Click Restore from Backup to open the restore modal.
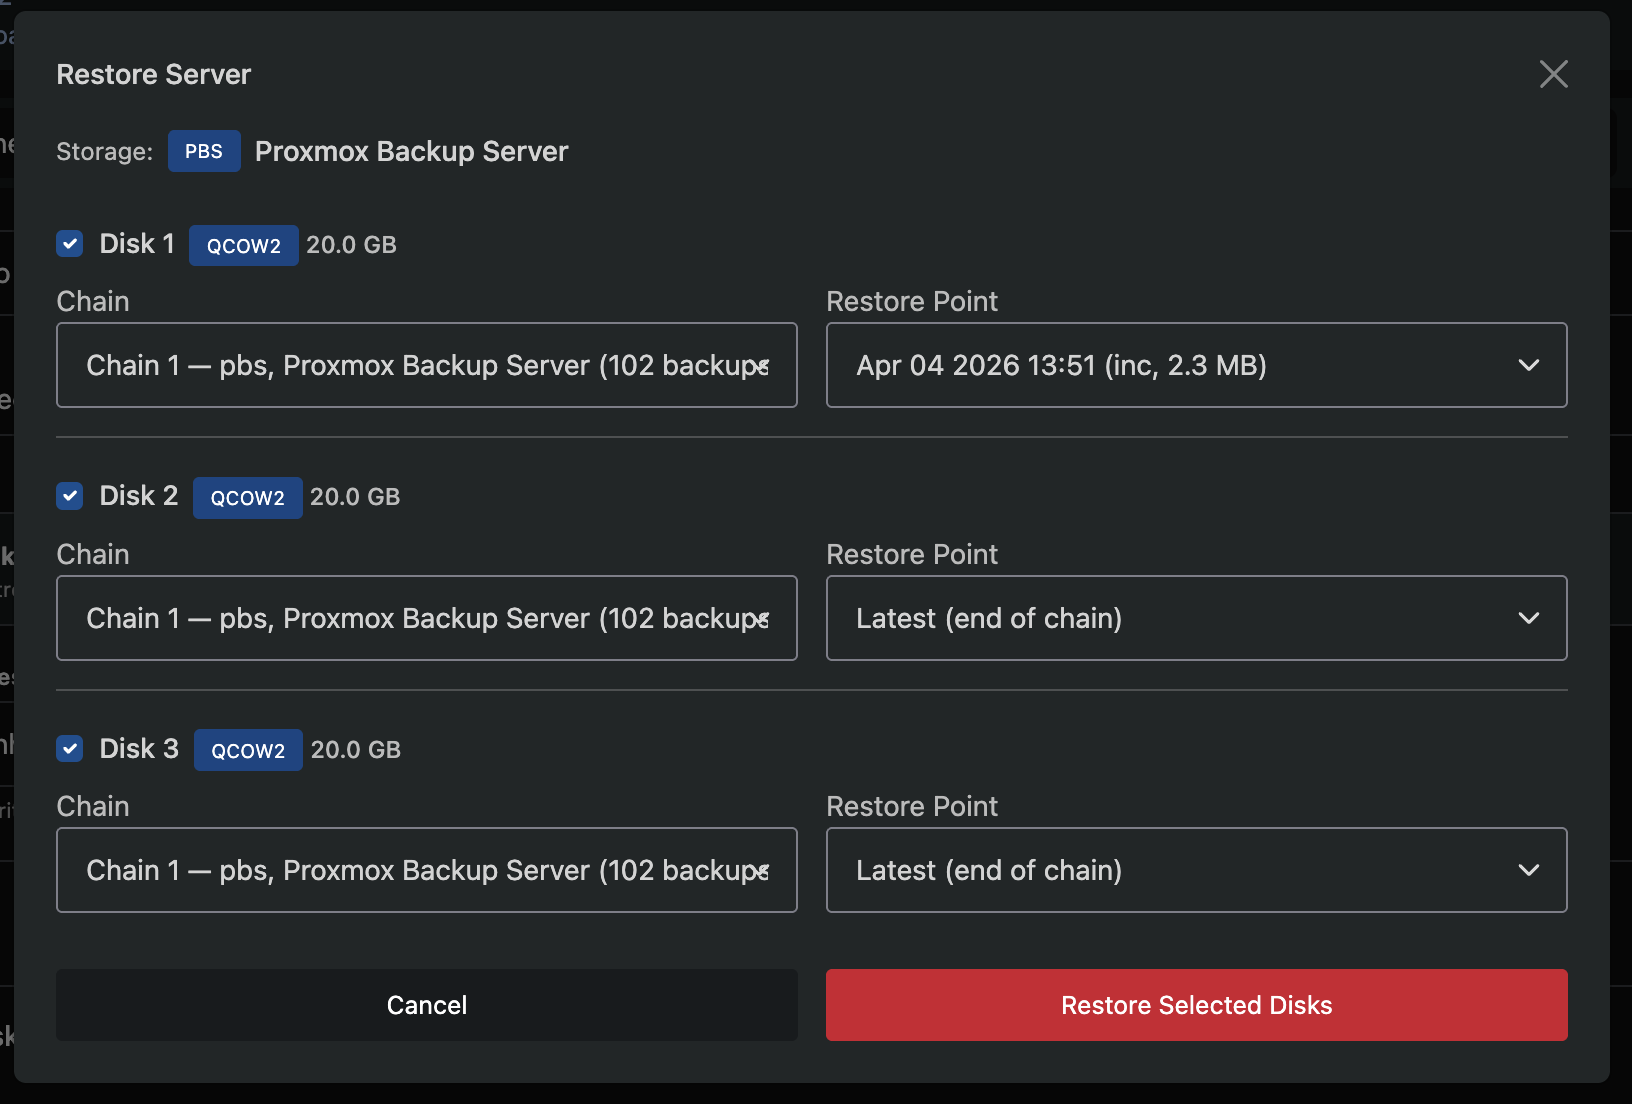
Step 1: Selection
- Select which disks to restore using the checkboxes
- Choose which chain to restore from (defaults to the latest)
- Choose a restore point within the chain (defaults to the latest backup)
Step 2: Confirmation
- Review the selected disks, chains, and restore points
- Confirm the operation
Restoring a disk overwrites its current data. The VM will be stopped during the restore and restarted when complete.
Removed Disks
If a virtual disk has been removed from a server but backups still exist for it, the disk is shown with a red removed badge. Removed disks are automatically excluded from restore operations (unchecked and disabled in the restore modal) but their backup data remains available for manual recovery.
CLI Restore to File
Click CLI Restore to File to generate a command for restoring a backup directly to a file on the hypervisor, rather than writing it back to the VM's disk. This is useful for manual recovery, forensic analysis, or extracting data from a backup without affecting the running VM.
- Select the disk, chain, and restore point
- Click Generate Restore Command
- A config file is written to the hypervisor and a ready-to-run CLI command is displayed
- Copy the command and run it via SSH on the hypervisor
The config file contains storage credentials. Delete it from the hypervisor after use.
Delete a Chain
Click the trash icon on a chain header to delete all backups in that chain. This permanently removes the backup files from remote storage.
PBS storage: PBS snapshots are shared across all disks. Deleting a chain on PBS storage will also delete backups for other disks at the same timestamps. The confirmation dialog shows the total number of affected records across all disks.
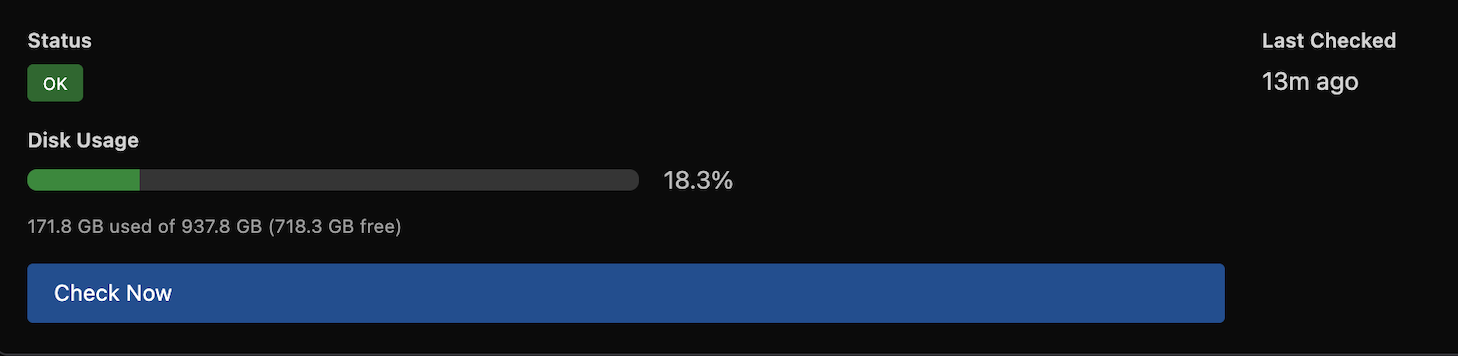
Storage Health
The Backup Manager automatically checks storage health every 30 minutes. Unhealthy storage is rechecked every 15 minutes.
Health status is visible in three places:
- Overview → Storage Summary: health dot and disk usage bar
- Storage list: health dot per storage
- Storage manage page: full health card with status, last checked time, error message, and disk usage breakdown
You can trigger an immediate health check from the storage manage page by clicking Check Now.
Health checks verify connectivity and, where supported, report disk usage:
| Backend | Connectivity | Disk Usage |
|---|---|---|
| SSH | ||
| PBS | ||
| Rclone | ||
| FTP | ||
| S3 |
Retention and Pruning
When a retention policy is configured, expired backups are automatically pruned. The system evaluates retention centrally and dispatches delete operations to hypervisors every 12 hours. The backup engine also prunes after each successful backup using the same rules.
All retention rules form a union - a backup is kept if any rule selects it:
- Active chain - for non-PBS backends, the latest incremental chain per disk per storage is always kept (pruning it would break the chain for the next incremental)
- Keep Last - the N most recent backups per disk are always kept, regardless of age or bucket rules
- Age window (age-based policies) - the backup is younger than the retention window (e.g. 90 days for "3 Months")
- GFS buckets (GFS policies) - the backup is the newest in its calendar bucket (day, week, month, or year) and the bucket is within the configured count
A backup is pruned only if none of these rules protect it.
How GFS pruning works:
When the prune cycle runs, each GFS bucket rule is evaluated independently:
- All backups are grouped into calendar buckets (e.g. one bucket per calendar day)
- Within each bucket, only the newest backup is considered (older ones in the same bucket are not protected by that rule)
- The N most recent buckets are kept (e.g.
7 dailykeeps the 7 most recent calendar days that have a backup) - Each rule adds to the keep set independently - a backup kept by the weekly rule is protected even if the daily rule would not keep it
Example: GFS 3 Months (7 daily, 4 weekly, 3 monthly) with Keep Last 2
Assume daily backups have been running for 4 months:
| Rule | Protects | Example |
|---|---|---|
| Active chain | 1 chain | Today's chain (always kept) |
| Keep Last 2 | 2 newest inactive chains | Yesterday's and the day before |
| 7 daily | Up to 7 chains | One per day for the last 7 calendar days |
| 4 weekly | Up to 4 chains | One per week for the last 4 calendar weeks |
| 3 monthly | Up to 3 chains | One per month for the last 3 calendar months |
After pruning, you would keep roughly 10-12 unique chains (many overlap between rules) and all older chains would be removed.
The Keep Last setting on the storage is the global default. Schedules can override it. A value of 2 (the default) means at minimum the two most recent backups per disk are always kept, regardless of the retention policy. This applies to both age-based and GFS policies.
Auto-Purge of Deleted VMs
When a virtual server is deleted in VirtFusion, its backups are not immediately removed. Instead, a purge is scheduled for a configurable number of days in the future.
Pending purges are processed automatically. If a purge fails, it retries with a 48-hour backoff after 3 consecutive failures.
To manually purge backups for deleted VMs on a schedule, click the Purge Deleted VMs icon on the schedule row.
Schedule-Wide Purge
To remove all backups for every VM on a schedule:
- Go to Backup Manager → Schedules
- Click the Purge All Backups icon on the schedule row
- Review the count of backups and VMs that will be affected
- Confirm the operation
This permanently deletes all backup files from remote storage for all VMs on this schedule. This cannot be undone.
Deleted Schedules
When a schedule is deleted, it is soft-deleted and can be restored. To view deleted schedules, use the Deleted filter on the Schedules page. Click the restore icon on a deleted schedule to bring it back in a disabled state, allowing you to review and re-enable it when ready.
Deleting a schedule does not remove existing backups. If you want to remove the backup data as well, use Purge All Backups before deleting the schedule.
Package Defaults
You can set a default backup access level per server package. Navigate to the package editor and find the Backups section.
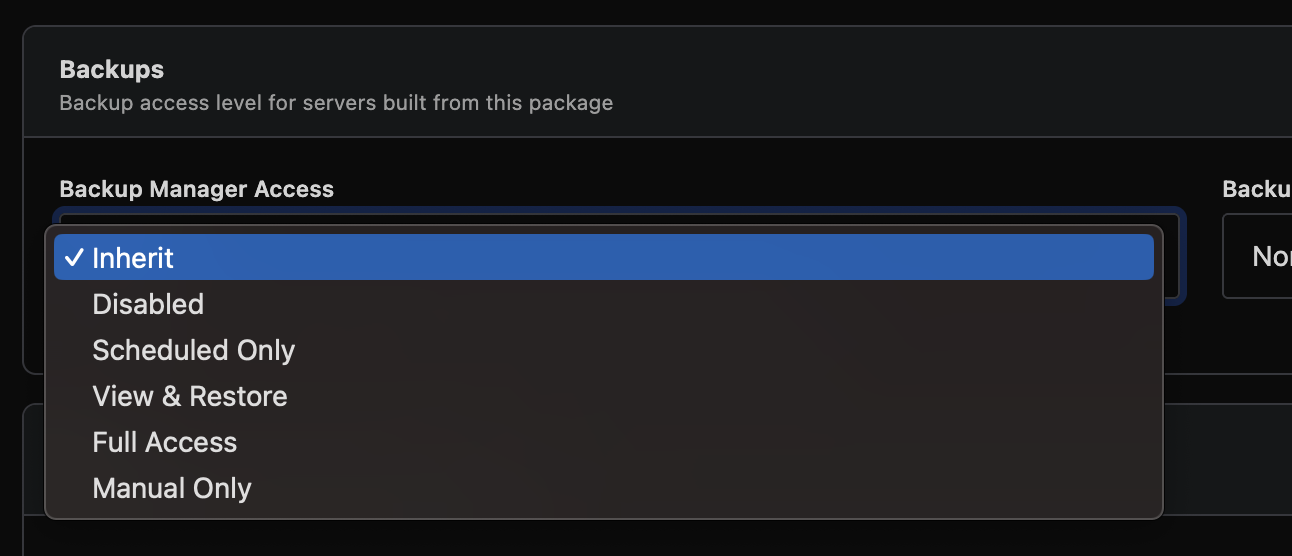
| Setting | Description |
|---|---|
| Backup Manager Access | Default access level for servers on this package. "Inherit" defers to the schedule's default |
This provides a convenient way to control backup access by plan tier. For example, give premium plans "Full Access" and basic plans "Scheduled Only."
End-User Experience
End users with access level View & Restore or higher see a simplified backup interface on their server management page.
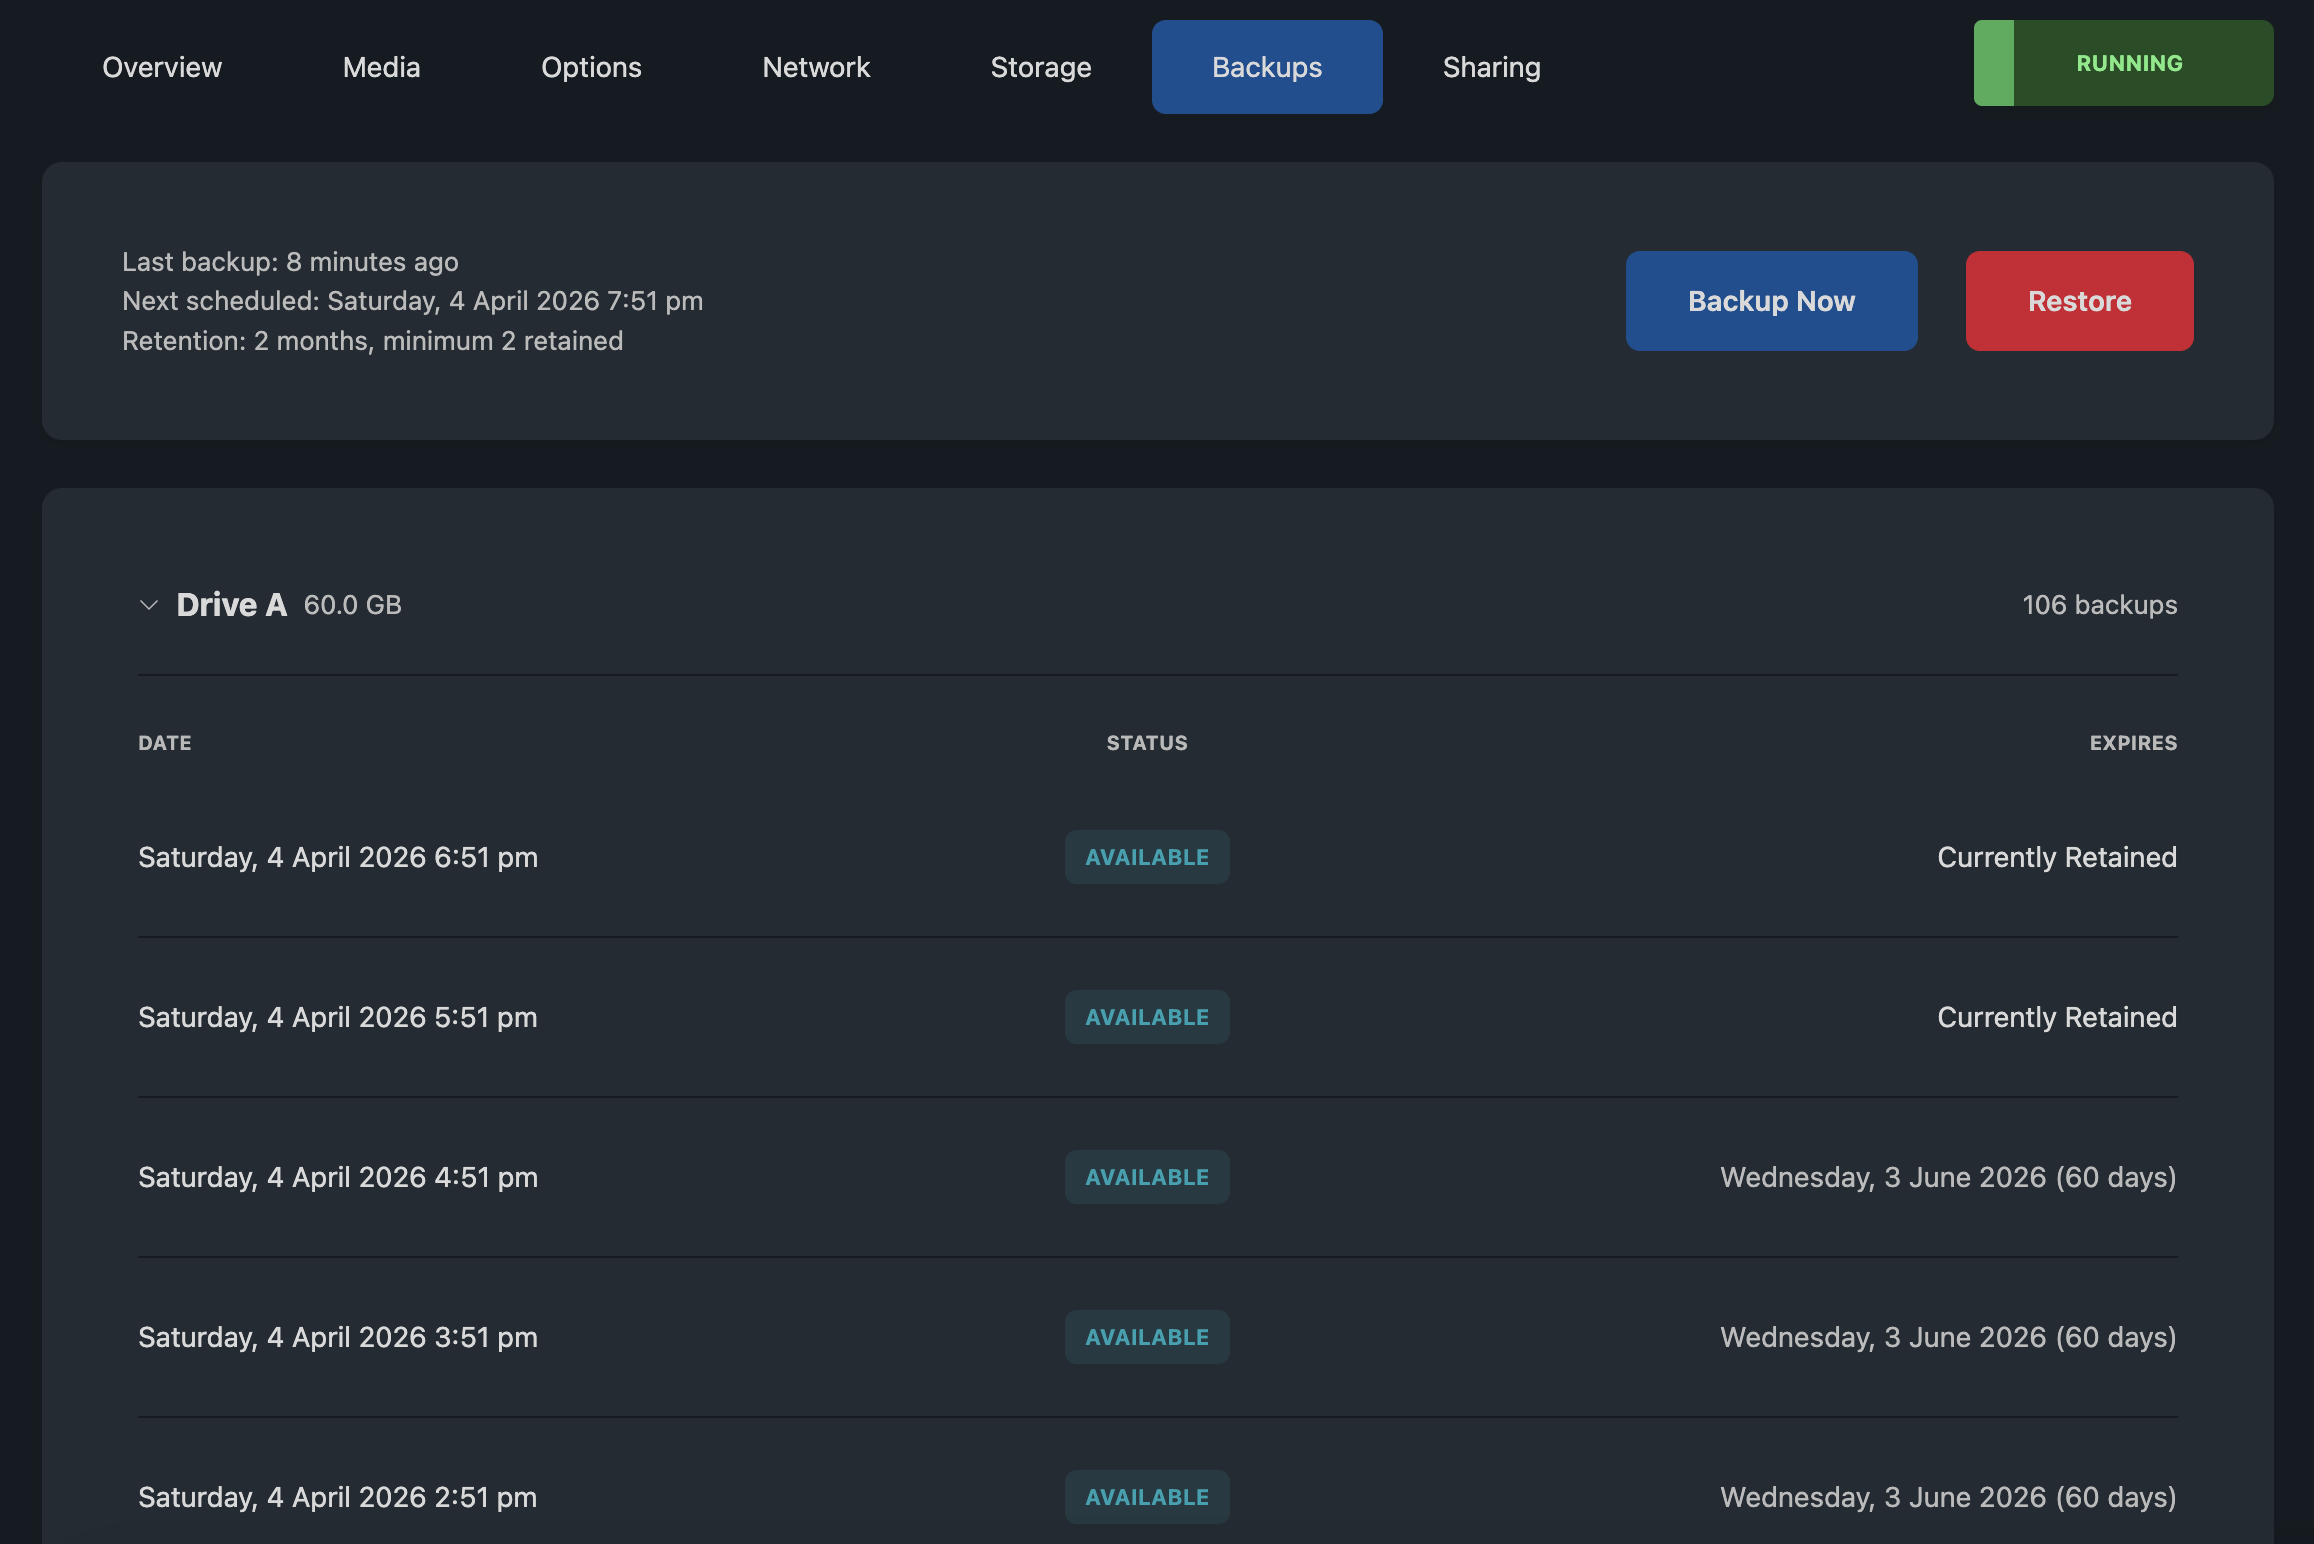
What Users See
- Last backup: when the most recent backup completed
- Next scheduled backup: when the next automatic backup is expected
- Retention summary: how long backups are kept
- Disk list: each virtual disk with its backup history
Each backup record shows the date and an expiry indicator:
| Indicator | Meaning |
|---|---|
| Currently Retained | No expiry configured, backup kept indefinitely |
| Date with days remaining | Backup will expire on this date |
| Expired | Past retention, will be removed on the next pruning cycle |
User Actions
Backup Now (Full Access and Manual Only): Users can trigger an immediate backup. A progress bar shows the operation status.
Restore (View & Restore, Full Access, and Manual Only): Users select which disks to restore and optionally pick a specific restore point. The interface uses drive letters (Drive A, Drive B).
Users see a simplified view with no chain IDs, storage details, or technical metadata. Error messages are generic and suggest contacting support for persistent issues.
Global Settings
Navigate to Backup Manager → Settings (button in the top-right of the dashboard) to tune runtime behaviour without code changes.
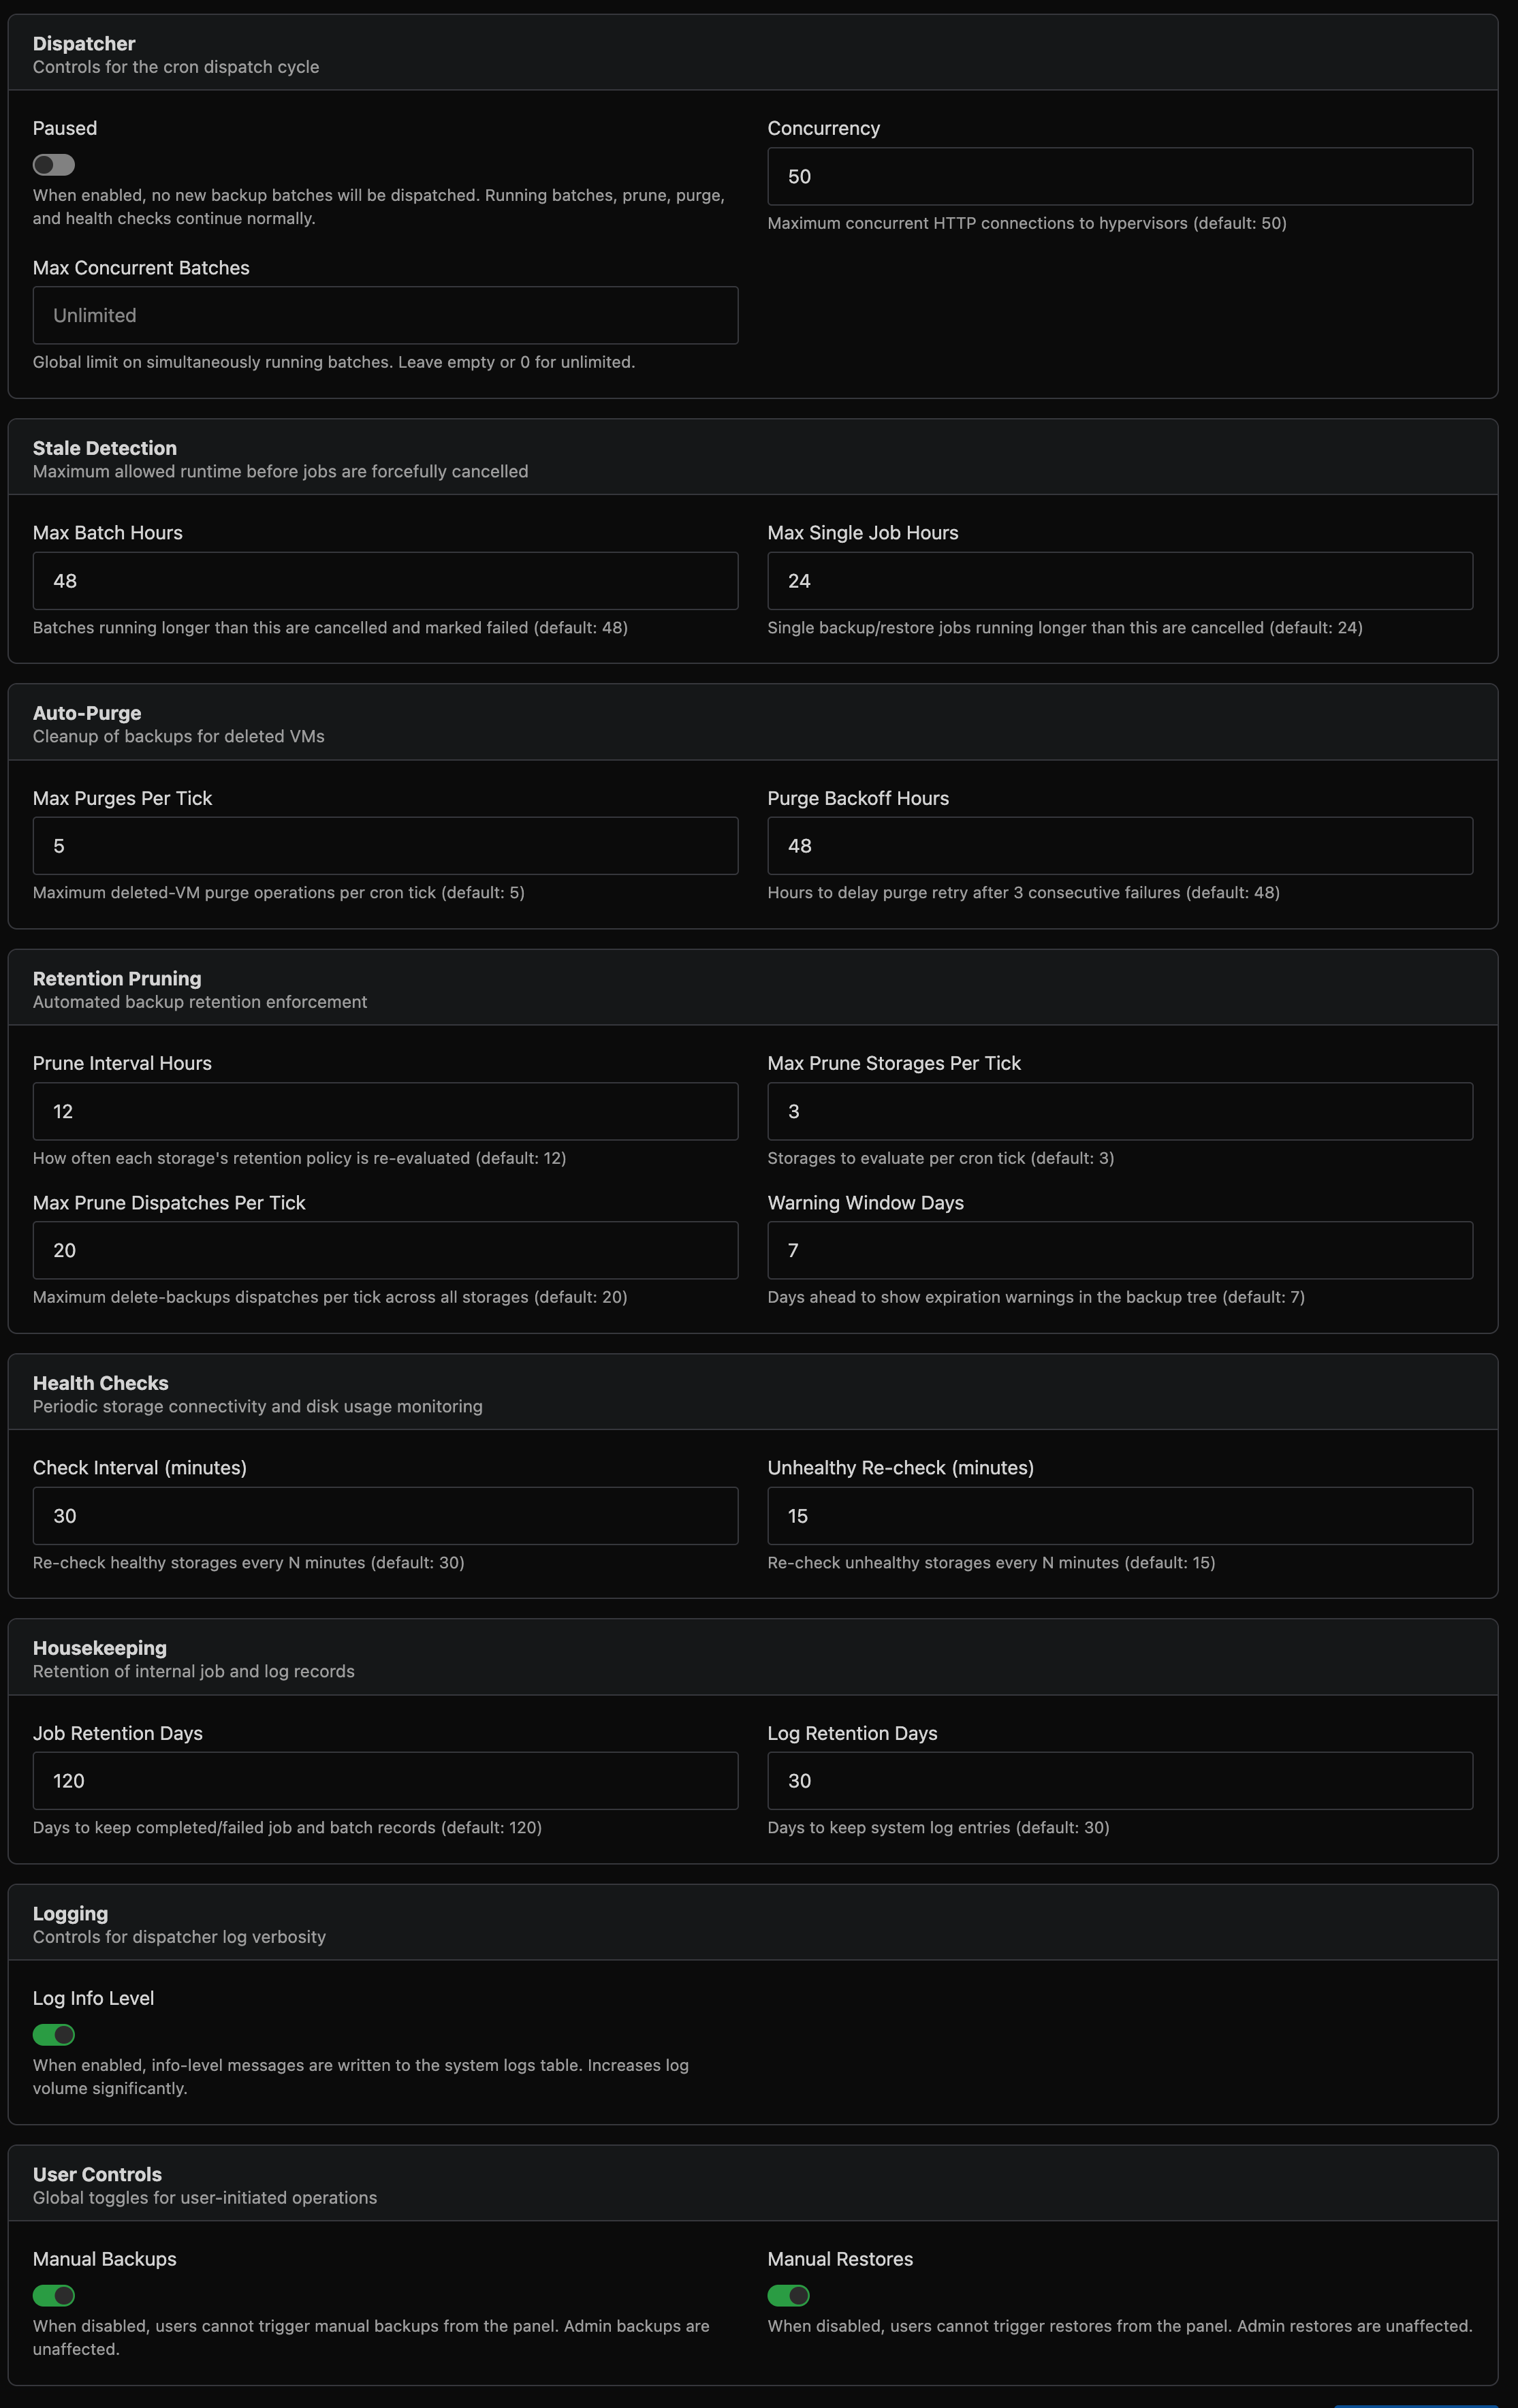
Settings take effect on the next cron tick. All values have sensible defaults and most installations will not need to change them.
Dispatcher
| Setting | Default | Description |
|---|---|---|
| Paused | Off | When enabled, no new backup batches are dispatched. Running batches, retention pruning, auto-purge, and health checks continue normally. Force dispatch is also blocked while paused. |
| Concurrency | 50 | Maximum concurrent hypervisor connections during dispatch. Increase for large fleets (500+ hypervisors). |
| Max Concurrent Batches | Unlimited | Global limit on simultaneously running batches across all schedules. Leave empty for unlimited. Useful for limiting load on shared storage. |
Stale Detection
| Setting | Default | Description |
|---|---|---|
| Max Batch Hours | 48 | Batches running longer than this are automatically cancelled and marked failed. |
| Max Single Job Hours | 24 | Individual backup or restore jobs running longer than this are cancelled. |
Auto-Purge
| Setting | Default | Description |
|---|---|---|
| Max Purges Per Tick | 5 | Maximum deleted-VM purge operations dispatched per cron tick. Purges run asynchronously and are tracked as jobs. |
| Purge Backoff Hours | 48 | After 3 consecutive purge failures for a VM, wait this many hours before retrying. |
Retention Pruning
| Setting | Default | Description |
|---|---|---|
| Prune Interval Hours | 12 | How often each storage's retention policy is re-evaluated. |
| Max Prune Storages Per Tick | 3 | Number of storages to evaluate per cron tick. |
| Max Prune Dispatches Per Tick | 20 | Maximum delete-backups jobs dispatched per tick across all storages. |
| Warning Window Days | 7 | Days ahead to show expiration warnings in the backup tree. |
Health Checks
| Setting | Default | Description |
|---|---|---|
| Check Interval (minutes) | 30 | Re-check healthy storages every N minutes. |
| Unhealthy Re-check (minutes) | 15 | Re-check failing storages more frequently. |
Housekeeping
| Setting | Default | Description |
|---|---|---|
| Job Retention Days | 120 | Days to keep completed/failed job and batch records. |
| Log Retention Days | 30 | Days to keep system log entries. |
Logging
| Setting | Default | Description |
|---|---|---|
| Log Info Level | Off | When enabled, info-level messages are written to the system logs table. Useful for debugging dispatch behaviour. Increases log volume significantly. |
User Controls
| Setting | Default | Description |
|---|---|---|
| Manual Backups | Enabled | When disabled, end users cannot trigger manual backups. Admin-initiated and scheduled backups are unaffected. |
| Manual Restores | Enabled | When disabled, end users cannot trigger restores. Admin restores are unaffected. |
| Backup Cooldown (minutes) | 60 | Minimum wait time between successful manual backups per server. Only successful completions trigger the cooldown - failed or cancelled jobs do not. Set to 0 to disable. |
| Restore Cooldown (minutes) | 60 | Minimum wait time between successful manual restores per server. Same rules as backup cooldown. Set to 0 to disable. |
Use the Paused toggle for planned maintenance windows. All monitoring and cleanup continues - only new batch dispatches are held.
Disabling the Legacy Backup System
If you are migrating to the Backup Manager, you should disable the legacy backup system. Navigate to Settings → General and find the Legacy Backup System setting, then disable it.
This will:
- Stop all legacy backup schedules from running
- Remove legacy backup options from the end-user interface
- Allow in-progress backups to finish normally
- Continue deleting expired backups that are already in a deleting state
This setting only affects the legacy system. The Backup Manager operates independently and is unaffected.
Before disabling the legacy system, ensure all servers have been migrated to Backup Manager schedules and that any legacy backups you need to retain have been accounted for.
Advanced CLI
The Backup Manager includes a powerful command-line tool installed on each hypervisor. The CLI provides advanced capabilities beyond what is available in the web interface:
| Feature | Description |
|---|---|
| Mount | Mount a backup as a read-only filesystem for file-level recovery. Supports local and remote backups (SSH, S3), with optional writable overlay |
| Verify | Deep integrity verification of backup files with per-frame SHA-256 checksums |
| Reindex | Rebuild backup metadata by scanning storage (disaster recovery) |
| Estimate | Query dirty data size per disk without running a backup |
| Prune | Run retention pruning manually with custom rules |
| Download | Download a raw disk image directly from PBS storage |
| Cleanup | Remove stale bitmaps, metadata, and temporary files from a hypervisor |
| Cancel | Cancel a running backup or restore operation |
| Inventory | List all backups for a server from local metadata |
| S3 Cleanup | List and abort stale S3 multipart uploads |
| Self-heal | Automatic recovery from interrupted backups (stale locks, frozen VMs, orphaned processes) |
The CLI also supports granular control over individual backup and restore operations, including per-disk backup type selection, mixed backup types in a single run, point-in-time restore, multi-disk restore, and resumable uploads.
Full CLI documentation will be available with the stable release.
Troubleshooting
Backups are not running
- Check the Overview for recent errors
- Verify the schedule is Enabled and the interval is > 0
- Verify the storage is Enabled (not disabled or read-only)
- Check the storage health status and run a manual health check
- Check that the VM's access level is not Disabled
Backup fails with "hypervisor unreachable"
VirtFusion cannot reach the hypervisor's API. Verify:
- The hypervisor is online and the VirtFusion agent is running
- Network connectivity between VirtFusion and the hypervisor
- The hypervisor's API port is accessible
Backup fails with storage connection errors
- Go to the storage manage page and click Check Now
- Review the error message in the health status
- Verify credentials and connection details
- Test from the hypervisor directly (SSH, S3 credentials, PBS token, etc.)
Restore fails
- Check the job log for the specific error (Jobs → click the job → View Log)
- Ensure the storage is not in read-only mode
- Verify the VM is not in rescue mode, migrating, or otherwise locked
SSH backup or restore fails after several hours
If backups or restores to SSH storage fail consistently after running for a long time (typically with exit status 255 in the log), the SSH connection is being dropped. This most commonly affects large disks (hundreds of GB) where the transfer takes several hours.
Check the remote SSH server:
- Verify
ClientAliveIntervalandClientAliveCountMaxare set in/etc/ssh/sshd_config(see SSH Server Configuration above) - Check sshd logs for disconnect events:
journalctl -u sshdaround the time of the failure - Check for OOM kills:
dmesg | grep -i "oom\|kill\|memory"
Check the network path:
- If using a cloud firewall (Hetzner, AWS, etc.), connection tracking timeouts may be dropping long-lived connections. Try disabling the firewall as a test
- Check
sysctl net.netfilter.nf_conntrack_tcp_timeout_establishedon both servers - NAT gateways and load balancers in the network path may also have idle connection timeouts
"A backup is already running"
Only one backup or restore operation can run per VM at a time. Wait for the current operation to complete, or check the Jobs page for stuck jobs.
Stale or stuck jobs
Occasionally a job may become stuck, for example if a hypervisor reboots mid-backup or a storage backend becomes unreachable during a transfer. Stuck jobs are automatically detected and cancelled:
- Batch jobs stuck for more than 48 hours (or 3x the schedule interval)
- Single jobs stuck for more than 24 hours
If a job appears stuck, it will be automatically cleaned up on the next dispatch cycle.